
Lawn
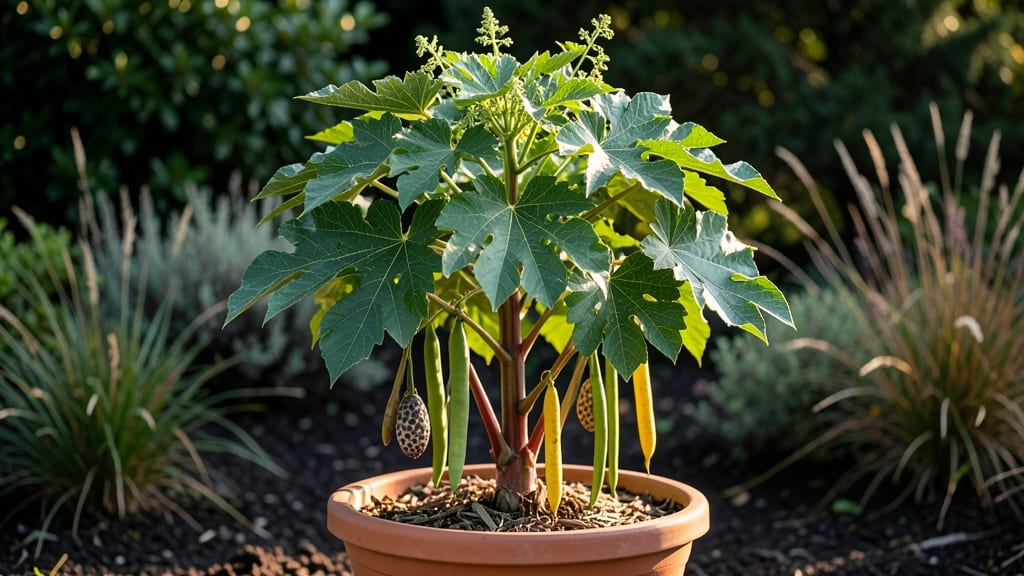
Growing castor beans from seed is like nature’s own seed-saving machine—those pods literally pop open to release fresh seeds when ready! 🌱 The first time I watched them split open on their own, I realized how effortless (and satisfying) this zero-waste process can be.
These tropical plants thrive in warm climates, producing striking red or green seed pods that double as living seed banks.
You’ll need well-draining soil, full sun, and patience—germination can take up to two weeks, but once established, castor beans grow fast into tall, striking plants. The key is spacing them 3-4 feet apart to prevent overcrowding, since they can reach heights of 6-10 feet.
Water consistently but avoid soggy soil, as these plants prefer it on the drier side once established.
By mid-summer, you’ll see those signature seed pods forming—each one a natural seed dispenser. When they’re dry and brown, they’ll split open dramatically, releasing fresh seeds for next season’s planting.
The process is so efficient that you’ll never need to buy seeds again, and the pods make for stunning dried arrangements too.
Fair warning: all parts of the castor bean plant are toxic if ingested, so keep it away from pets and children. With proper care, though, these plants are low-maintenance and incredibly rewarding—both for their striking appearance and their self-sustaining seed system. Ready to grow your own seed bank?
📚 In This Guide
- What you need
- Instructions
- Tips and common mistakes
- Wrapping up and next steps
What you need
- ● Seed castor bean seeds: 3–5 seeds (non-GMO, untreated for best results). Note: Handle with care—seeds contain ricin, a toxin if ingested!
- ● Well-draining potting mix: 1–2 gallons (sterile, peat-free if preferred). Pro tip: Mix in perlite or vermiculite for extra aeration!
- ● Containers: Seed-starting trays: 4–6 cell packs (3–4 inches deep) for germination.
- ● Larger pots: 5–7 inch diameter (for transplanting seedlings).
- ● Slow-release fertilizer: Balanced 10-10-10 or organic option (1 tbsp per pot).
- ● Gloves: Nitrile or rubber (to avoid skin contact with seeds).
- ● Spray bottle: For gentle watering (16 oz with a fine mist nozzle).
- ● Trowel: Small hand trowel for transplanting.
- ● Pruners: Sharp bypass pruners (for harvesting pods).
- ○ Thermometer (optional): To monitor soil temps (ideal: 70–85°F for germination).
- ● Location: Full sun (6+ hours daily) or bright indirect light (for indoor starts).
- ● Climate: Warm-season plant—avoid frost (<50°F).
- ● Safety: Wear gloves when handling seeds/pods—never ingest any part of the plant.
- ● Keep out of reach of pets/kids (ricin is deadly if consumed).
- ● Patience: Germination takes 7–21 days; pods mature in 3–6 months!
Step-by-step guide to growing castor beans from seed
Here’s how to cultivate these striking plants with pods that open dramatically to release seeds—nature’s built-in zero-waste system.
🌱 Step 1: Start Seeds Indoors in Warmth
Castor beans (Ricinus communis) thrive in warmth, so begin seeds indoors 8-10 weeks before your last frost date. Fill 4-inch pots with sterile seed-starting mix (never garden soil—it’s too dense). Press one seed ½ inch deep into each pot, spacing them 2 inches apart. The seed’s glossy coat resists water, so soak it overnight in lukewarm water before planting to soften the shell.
Cover the pots with clear plastic wrap to retain moisture and warmth, then place them in a 75-85°F environment. A seedling heat mat speeds germination, which typically occurs in 7-14 days. Keep the soil evenly moist—never soggy—by misting lightly daily. Once sprouts emerge, remove the plastic immediately to prevent damping-off, a fungal disease that collapses young stems.
☀️ Step 2: Harden Off and Transplant Outdoors
After 4-6 weeks, seedlings will develop 2-3 true leaves and be ready for hardening off. Move pots outside to a sheltered, shaded spot for 1-2 hours the first day, gradually increasing exposure over 10-14 days. Castor beans tolerate heat but avoid transplanting when temperatures exceed 90°F—they’ll bolt prematurely.
Choose a sunny location with well-draining soil (they hate soggy roots). Dig holes twice as wide as the root ball but no deeper. Space plants 3-4 feet apart—they grow 6-10 feet tall and need room to avoid crowding. Water deeply at transplanting to settle the soil, then mulch with 2 inches of organic matter to retain moisture and suppress weeds.
💧 Step 3: Maintain Moisture and Fertility
Castor beans prefer consistent moisture but not waterlogged soil. Water deeply once weekly, aiming for 1 inch of water per week, and adjust for rainfall. Yellowing leaves signal underwatering, while wilting stems mean overwatering. Fertilize lightly with a balanced 10-10-10 fertilizer at planting and again when pods form. Too much nitrogen encourages leafy growth at the expense of seed pods.
These plants are drought-tolerant once established, but dry spells stress them. If pods form but don’t swell, the plant may need more phosphorus—switch to a 5-10-10 formula to encourage flowering. Watch for spider mites in dry conditions; hose plants down in the early morning to deter pests.
⏰ Step 4: Harvest and Save Seeds Sustainably
The magic happens when pods mature: they split open dramatically when dry, releasing seeds naturally. Harvest pods when they turn brown and papery (typically 3-4 months after planting). Wear gloves—castor bean seeds contain ricin, a toxic compound, though the castor oil extracted from them is safe.
To save seeds, collect pods before they split and dry them in a well-ventilated area for 2 weeks. Shake dried pods to release seeds, then store them in a cool, dark place for up to 2 years. The pods’ natural dehiscence (opening) makes castor beans a zero-waste seed-saving plant—no need for manual extraction.
✂️ Step 5: Prune and Overwinter (If Needed)
Castor beans are annuals in most climates but can survive mild winters in USDA zones 9-11. In colder areas, cut back dead foliage in late fall to tidy the garden bed. In warmer zones, plants may regrow from the base in spring. If you’re growing them for ornamental value, prune leggy stems in early summer to encourage bushier growth.
Here’s the thing—castor beans are fast-growing but short-lived. Focus on early planting to maximize seed production before the first frost. Their striking red or green pods add drama to the garden, but always supervise children and pets around the plants to prevent accidental ingestion of seeds.
Tips & tricks for growing dramatic castor bean pods
Here’s what I’ve learned after watching castor beans transform my garden—these tips turn good growth into spectacular seed-popping displays.
Seed Prep Matters: The overnight soak in lukewarm water isn’t just about moisture—it softens that tough seed coat enough for roots to emerge. I’ve found that using a glass jar instead of plastic prevents condensation buildup, which can cause mold. Place the jar in a 75-85°F environment (like on top of a fridge) to maintain consistent warmth during germination. This step makes the difference between waiting 14 days and seeing sprouts in just 7 days.
Harden Off Strategically: The gradual 10-14 day hardening process is crucial, but don’t rush it—castor beans are sensitive to temperature swings. Start with just 1-2 hours of morning sun exposure on the first day, then increase by 1 hour each subsequent day. I’ve noticed that moving pots to a north-facing windowsill during the hardening process gives them gentle light without the intensity of direct afternoon sun, which can stress young plants.
Soil Science for Success: While castor beans tolerate a range of soil types, their well-draining requirement can’t be overstated. I’ve had the best results amending garden soil with 1 part perlite to 3 parts compost before transplanting. This prevents the dreaded "soggy root syndrome" that causes yellowing leaves. The 2 inches of organic mulch you’ll add helps maintain moisture without suffocating the roots—just keep it 2 inches away from the stem to prevent rot.
Harvest Timing is Everything: Those 3-4 months until harvest fly by, but spotting the perfect moment requires patience. Look for pods that are completely brown and papery—they should make a dry rattling sound when shaken. I’ve learned to harvest in mornings after dew has dried to prevent moisture from causing premature splitting. Once you collect pods, spread them on paper towels in a single layer to dry for the 2 weeks—this prevents mold and ensures clean seed release.
Pro Tips for Seed Castor Bean
- Here’s what I’ve learned after watching castor beans transform my garden—these tips turn good growth into spectacular seed-popping displays.
- Seed Prep Matters: The overnight soak in lukewarm water isn’t just about moisture—it softens that tough seed coat enough for roots to emerge.
- Harden Off Strategically: The gradual 10-14 day hardening process is crucial, but don’t rush it—castor beans are sensitive to temperature swings.
Frequently asked questions
Got questions about growing seed castor beans? You’re not alone! Here are some of the most common queries—plus quick, practical answers to help you grow these unique pods like a pro.
How long does it take for castor bean pods to mature and pop open?
Castor bean pods typically mature in 120–150 days after planting, depending on your climate. Once ripe, they’ll crack open dramatically (hence the "pop" in the title!) to release seeds. Watch for pods to turn brown and dry before they burst—harvest seeds immediately to avoid scattering!
Are castor bean seeds safe to handle? I’ve heard they’re toxic.
Yes, all parts of the castor bean plant are toxic if ingested, especially the seeds (which contain ricin, a deadly compound). Wear gloves when handling seeds or pods, and never plant them where children or pets can access them. Only experienced gardeners should grow them—with extreme caution!
Can I grow castor beans in containers, or do they need a garden bed?
Castor beans thrive in large containers (at least 12–18 inches deep) if you live in a warm climate. Use well-draining soil and place pots in full sun. In cooler zones, start seeds indoors and transplant outdoors after the last frost. Pro tip: Add compost to containers to boost nutrient-rich soil for these heavy feeders!
What’s the best climate for growing castor beans?
Castor beans love warm weather (USDA zones 9–11) and cannot tolerate frost. Plant after soil temps hit 70°F (21°C), and expect 10–12 hours of sunlight daily. In cooler areas, grow them as annuals in pots and bring them indoors before winter. Heat lovers!
What can I do with castor bean seeds if I don’t want to plant them?
Castor bean seeds have industrial uses (like castor oil production) but are not edible. You can:
- Donate seeds to schools or universities for educational purposes (with safety warnings).
- Use them in crafts or art projects (e.g., seed bombs—but wear gloves!).
- Dispose of them responsibly by sealing in a bag and throwing away (never compost!).
Wrapping up and next steps
Growing seed castor beans is a rewarding way to embrace zero-waste gardening while adding a unique, self-sustaining plant to your space. Their striking pods and easy seed-saving process make them a fantastic choice for both beginners and seasoned gardeners—plus, you’ll love watching nature’s built-in seed dispersal in action! 🌱
Ready to take the next step? Start by planting a few seeds this season and experiment with different growing conditions. Share your progress with fellow plant enthusiasts or even gift some seeds to friends—spreading the joy (and the pods!) is half the fun. Happy growing! 🌟