
Planting
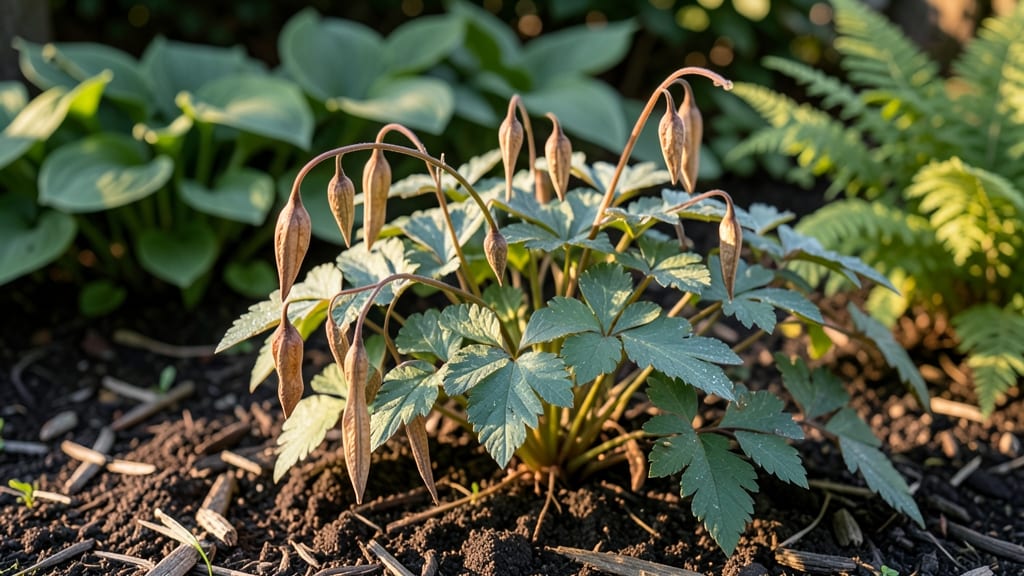
Collecting bleeding heart plant seed pods is like harvesting nature's tiny time capsules—each one holds the potential for new growth without a single twist or tug. 🌿 The pods form after your plant's delicate pink hearts bloom, turning from green to papery brown when ready.
Unlike division, which works best for established plants, seed pods let you propagate bleeding hearts from scratch, creating new plants that match your garden's exact conditions.
You'll need just a few simple tools: sharp scissors or pruners for harvesting, a paper bag for collection, and patience for the germination process. The pods release seeds when fully dry—no need to crack them open.
Once collected, store them in a cool, dry place until you're ready to sow, which is best done in early fall for spring blooms or in late winter for summer flowering.
Germination takes time and consistency—keep the soil lightly moist and the seeds in a shady spot with temperatures between 60-68°F. Seeds may take 4-6 weeks to sprout, and dormancy can delay this further, so don't rush the process.
The payoff? New bleeding heart plants that thrive with the same care as their parents, filling your garden with heart-shaped blooms year after year.
For established plants, division is still the fastest way to expand your garden, but seed pods offer a rewarding challenge. If you're patient and willing to wait, this method lets you grow bleeding hearts that feel uniquely yours—no nursery tags required. Here's how to do it right the first time.
📚 In This Guide
- What you need
- Instructions
- Tips and common mistakes
- Wrapping up and next steps
What you need
- ● Mature bleeding heart plant (Dicentra spectabilis): Ensure it’s at least 2–3 years old and has fully ripened seed pods (typically late summer to early fall).
- ● Pruning shears or clean scissors: 1 pair, sterilized with rubbing alcohol to prevent disease spread.
- ● Paper bags or brown lunch bags: 3–5 medium-sized, for collecting pods (avoid plastic—it can trap moisture).
- ● Newspaper or cardboard: 1–2 sheets, to create a drying surface.
- ● Small paintbrush or soft toothbrush: 1, for gently brushing out seeds.
- ● Labeling tags or masking tape: 5–10, to mark seed varieties (if saving multiple types).
- ● Air-dry location: A shady, well-ventilated spot (e.g., garage shelf, basement corner) with 50–70°F (10–21°C) temperature.
- ● Seed envelope kit: For long-term storage (e.g., 10–20 envelopes with silica gel packets).
- ● Magnifying glass: 1, to spot tiny seeds in pods.
- ● Hair dryer (cool setting): 1, for stubborn pods (use sparingly!).
- ● Compost bin: For discarded pods or plant debris (eco-friendly!).
- ● Notebook: To log harvest dates and growing conditions.
How to harvest bleeding heart plant seed pods without damaging the stems
This method keeps your plant healthy while collecting seeds—no twists, no tugs, just gentle handling.
🌿 Step 1: Wait for Pods to Fully Mature
Bleeding heart seed pods turn from green to a papery brown when ready—this usually happens in late summer or early fall, depending on your climate. The pods should feel dry and crispy to the touch, almost like they’re ready to burst open on their own. If you pick them too early, the seeds inside won’t be fully developed.
Here’s the thing—don’t rush. If you see the pods starting to split open naturally, that’s your signal to act quickly. The seeds inside will scatter if left unattended, so keep an eye on them once they turn brown. I like to check them every few days once they reach this stage.
✂️ Step 2: Snip Pods at the Base with Clean Scissors
Use sharp, sterilized pruning shears to cut the seed pods where they meet the stem. This prevents tearing and keeps the plant looking tidy. Hold the stem gently with one hand while you snip—you don’t want to accidentally pinch the delicate growth below. A clean cut also reduces the risk of disease entering the plant.
I always sterilize my shears with rubbing alcohol before and after cutting. This step is especially important if your bleeding heart plant has been in the garden all season—you don’t want to introduce any unwanted pathogens. Collect the pods in a small paper bag or envelope to keep them contained and dry.
🪴 Step 3: Dry the Pods Completely Before Opening
Spread the harvested pods out on a dry, well-ventilated surface like a windowsill or a mesh screen. Let them dry for 7-10 days until they’re completely brittle. You’ll know they’re ready when they rattle slightly when shaken—this means the seeds inside are fully mature and ready to release. Avoid using heat to speed this process, as it can damage the seeds.
Real talk: If you’re impatient, you might be tempted to crack open the pods early. But damp or partially dry pods can mold, ruining your entire seed batch. Patience here pays off—wait until they’re fully dry before proceeding.
🌱 Step 4: Gently Release Seeds Without Twisting
Once the pods are dry, place one in your hand and give it a light squeeze—not a twist, just a gentle press. The pod should open naturally, releasing the small, dark seeds inside. If it resists, let it dry a little longer. Twisting or forcing the pod can damage the seeds or even crush them.
I like to use a small bowl or envelope to catch the seeds as they fall out. This keeps them from scattering everywhere, which is especially helpful if you’re working near other plants. Once all the seeds are out, store them in a labeled envelope in a cool, dry place until you’re ready to plant them next spring.
⏰ Step 5: Store Seeds Properly for Next Season
Place the collected seeds in a paper envelope (not plastic—it traps moisture) and label it with the date and plant variety. Store them in a cool, dark place like a seed drawer or even the back of your fridge. Bleeding heart seeds can stay viable for 1-2 years if stored correctly, though germination rates drop after the first year.
Don’t skip the labeling—bleeding heart seeds are tiny and look similar to many other woodland plants. If you mix them up, you might end up planting something unexpected. I also make a note of the year I collected them so I can keep track of their freshness.
Tips & tricks for perfect bleeding heart seed collection
These gentle techniques will help you harvest your bleeding heart seeds without stressing your plant or wasting a single one.
Timing is Everything: In Step 1, when you notice the pods turning papery brown, that's your cue—but don't wait too long! The pods will eventually split open on their own, releasing seeds all over your garden. I've learned the hard way that checking them every 2-3 days once they reach this stage prevents any surprises. If you're unsure whether they're ready, give one a gentle squeeze—if it feels completely dry and brittle, it's time to harvest.
Tool Prep Matters: Before you even begin Step 2, take 2 minutes to properly sterilize your pruning shears with rubbing alcohol. I can't stress this enough—skipping this step once led to a fungal issue on my bleeding heart plant that took weeks to recover from. A quick wipe with alcohol between cuts keeps everything sanitary, especially if you're working with multiple plants. Also, use a small paper bag or envelope to collect pods immediately—this prevents them from getting damp or dirty while you work.
Drying Strategy: During Step 3, resist the urge to speed up the drying process with heat. I once tried using my oven on low to dry pods faster, and it completely ruined the seeds—they were brittle and wouldn't germinate. Instead, place pods on a mesh screen or paper towel in a dry, well-ventilated spot. The 7-10 day drying time might seem long, but it's crucial for seed viability. You'll know they're ready when they rattle like tiny maracas when shaken gently.
Pro Tips for Bleeding Heart Plant Seed Pods
- These gentle techniques will help you harvest your bleeding heart seeds without stressing your plant or wasting a sin...
- Timing is Everything: In Step 1, when you notice the pods turning papery brown, that's your cue—but don't wait too lo...
- Tool Prep Matters: Before you even begin Step 2, take 2 minutes to properly sterilize your pruning shears with rubbin...
Frequently asked questions
Got questions about bleeding heart plant seed pods?
You’re not alone! Here are answers to the most common queries—from timing to troubleshooting—so you can handle those delicate pods like a pro.
When do bleeding heart seed pods ripen?
Bleeding heart seed pods typically mature late summer to early fall (August–October, depending on your climate). Look for pods that turn dry, brown, and papery—they’ll split open on their own when fully ripe. Avoid harvesting too early, or the seeds won’t germinate!
How long does it take for seeds to germinate?
With patience, bleeding heart seeds can take 2–4 weeks to sprout! Keep them in moist, well-draining soil at 60–70°F (15–21°C). Cold stratification (chilling seeds for 4–6 weeks) can boost germination rates—just store them in a damp paper towel in the fridge before planting.
Can I collect seeds from store-bought bleeding hearts?
Unfortunately, no—most nursery plants are hybrids or sterile cultivars (like ‘Davidii’). For true-to-type seeds, grow from open-pollinated varieties or source seeds from specialty growers. Check the plant tag or ask the seller!
Why aren’t my seed pods opening?
If pods stay closed, they’re likely underripe. Wait a few more weeks or check for:
- Moisture issues: Too much humidity can delay drying.
- Pests: Slugs or aphids may damage pods before they split.
- Temperature: Cold snaps can stall maturation.
What’s the best way to store bleeding heart seeds?
For long-term storage (up to 2 years), dry seeds completely, then store them in a paper envelope (not plastic!) in a cool, dark place. Label with the date—fresh seeds germinate best! Need to plant sooner? Sow them immediately in a cold frame for natural stratification.
Wrapping up and next steps
Growing bleeding heart plant seed pods is a rewarding way to propagate these stunning perennials while embracing zero-waste gardening. With just a few gentle twists and minimal tools, you can unlock new plants from dried pods—no stress, no fuss! 🌱✨
Ready to give it a try? Start by collecting mature seed pods from your garden (or a trusted source) and follow the simple steps above. Soon, you’ll be sharing these delicate beauties with fellow plant lovers—or even gifting them to friends. Happy growing!