
Lawn
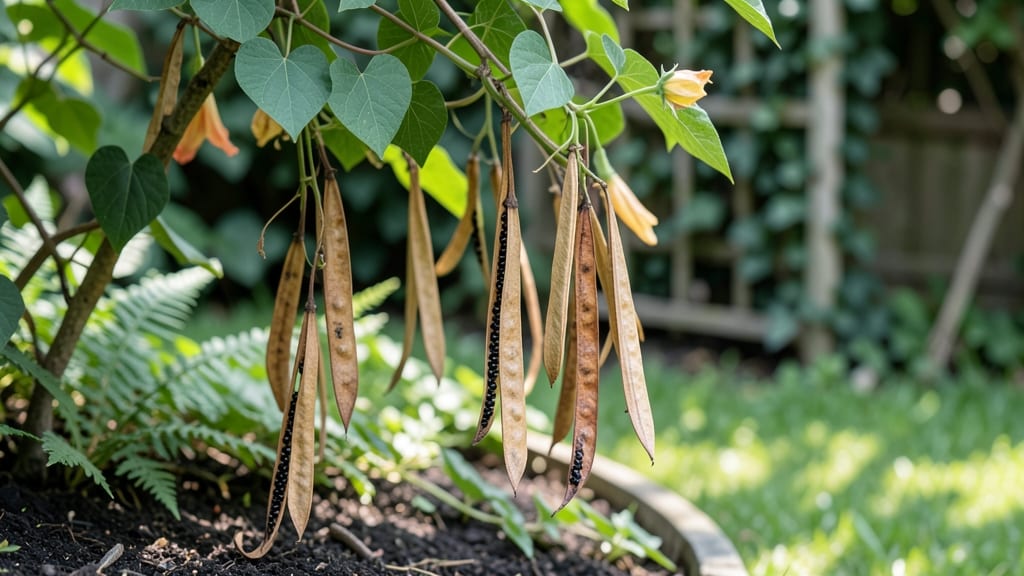
Saving black-eyed Susan vine seed pods is the easiest way to multiply your plants without spending a dime. 🌱 These papery pods naturally pop open when dry, releasing seeds that store like magic for years—if you know the right timing and handling.
I’ve saved seeds from my own vines for three seasons now, and the method is simpler than it looks once you understand the plant’s rhythm.
The key is patience and observation. Wait until the pods turn light brown and begin to split open on their own—this usually happens in late fall after the first frost.
Once they’re dry, gently shake the pods over a bowl or paper to catch the seeds, which resemble tiny, flat discs with a dark center. Avoid moisture during storage, as dampness can trigger mold before planting season.
You’ll end up with seeds that sprout reliably if you stratify them for 4-6 weeks in the fridge before sowing. The vines grow aggressively, so plant them where they can climb or spread without crowding other plants.
A single pod can yield dozens of seeds, making this a zero-waste way to expand your garden effortlessly.
If seeds don’t germinate the first year, don’t worry—black-eyed Susan vines often need two seasons to break dormancy. Just store them in a cool, dry place and try again next spring.
This method works for both gardeners with sprawling trellises and those growing in containers, as long as you give the vines room to thrive.
📚 In This Guide
- What you need
- Instructions
- Tips and common mistakes
- Wrapping up and next steps
What you need
- ● Mature Black Eyed Susan Vine seed pods – Collect only fully dried, brown pods (they should pop open easily when gently squeezed). Aim for 10–20 pods for a good seed yield.
- ● Clean, dry paper towels or newspaper – A full sheet (or two) to lay out seeds for drying.
- ● Small cardboard box or envelope – For storing seeds temporarily (ensure it’s breathable to prevent mold).
- ● Pencil or chopstick – To gently pry open stubborn pods (if needed).
- ● Fine-mesh strainer or sieve – A 4-inch strainer works best for separating seeds from chaff.
- ● Labeling supplies – Masking tape + marker (or a permanent marker) to tag your seed storage with the date and variety.
- ● Desiccant packets (like silica gel) – To keep seeds extra dry in storage.
- ● Small glass jar with lid – For long-term seed storage (airtight but not sealed completely to avoid moisture buildup).
- ● Hand lens or magnifying glass – For inspecting seed quality up close.
- ● Notebook – To log growing conditions (e.g., pod color, location, weather) for future reference.
Instructions for harvesting black-eyed Susan vine seeds naturally
Watch those seed pods transform from green to brown—it’s nature’s way of telling you it’s time to collect seeds.
🌱 Step 1: Identify and Wait for Mature Seed Pods
Black-eyed Susan vine seed pods start green and firm, then dry out to a papery brown. Wait until they’re completely brown and begin splitting open naturally—this usually happens in late summer or early fall, depending on your climate. You’ll know they’re ready when you see the pods cracking along their seams.
Gently shake the vine to release any seeds already exposed. If pods are still tightly closed, leave them on the plant for another day or two. Harvesting too early means immature seeds that won’t germinate. I always check pods in the morning when dew is present—they’ll feel light and brittle when ready.
💧 Step 2: Collect Seeds Without Damaging the Vine
Place a clean, dry bowl or paper bag beneath the vine’s seed pods. Hold the vine steady with one hand and gently tap the pods with the other. The seeds will pop out easily once the pods are fully dry. Avoid pulling or twisting the pods—they’re fragile at this stage and may crumble.
If some seeds stick to the pod walls, use a small paintbrush or your fingers to coax them free. Work in a shaded area to prevent seeds from blowing away. I like to do this on a calm day when there’s no wind—it makes cleanup easier and ensures you don’t lose any seeds to the breeze.
☀️ Step 3: Clean and Dry the Seeds
Spread the collected seeds on a clean, dry paper towel or mesh screen in a warm, dry place. Let them air-dry for 3-5 days, stirring occasionally to prevent mold. The seeds are ready when they’re completely dry and rattle slightly when shaken in their container.
Remove any debris, chaff, or empty seed pods by hand. I use a small sieve to separate the seeds from fine particles, but a gentle breeze through an open window works just as well. Store the clean seeds in a labeled envelope or small glass jar in a cool, dark place for up to 2 years—they’ll stay viable for your next planting.
⏰ Step 4: Test a Few Seeds for Germination (Optional)
To ensure your seeds are viable, plant a small batch in a pot with well-draining soil. Moisten the soil and press a few seeds ¼ inch deep. Keep the soil consistently moist (not soggy) and place the pot in a warm, sunny spot. You should see sprouts in 7-14 days—this confirms your seeds are ready for larger-scale planting.
If germination is slow or spotty, your seeds may need a cold stratification period. Place the sealed container of seeds in the refrigerator for 2-4 weeks before replanting. This mimics winter conditions and often triggers better germination for Black-eyed Susan vines. I always test a few seeds first to avoid disappointment when I’m ready to plant my entire batch.
Tips & tricks for perfect black-eyed Susan vine seed collection
These simple tricks will help you maximize your seed yield while keeping the process gentle on your plants—and your patience.
Timing Secret: I've learned the hard way that morning is the best time to harvest. Dew makes the pods extra brittle, so they release seeds with just a gentle tap. If you harvest in the afternoon, pods might still be slightly damp, making them harder to clean properly.
Collection Technique: Use a small paintbrush or your fingers to coax stubborn seeds from pod walls—don't force it! I've seen people try to scrape with knives, which ruins the delicate pods. A soft touch prevents damage while getting every last seed. Work over a dark-colored tray to spot any seeds that might fall on light surfaces.
Drying Strategy: The 3-5 day drying period is crucial—don't rush it! I've had seeds mold when left too long, but also seen them fail to germinate when dried too quickly. Stir your seeds every 12 hours to ensure even drying. A mesh screen works better than paper towels because it allows air to circulate from all sides.
Storage Wisdom: Label your seed containers with the year and variety if you're saving multiple types. I use small glass jars with tight lids because they're airtight and let me see the seed levels. Store in the refrigerator's crisper drawer for extra humidity control if you live in a dry climate.
Pro Tips for Black Eyed Susan Vine Seed Pods
- These simple tricks will help you maximize your seed yield while keeping the process gentle on your plants—and your p...
- Timing Secret: I've learned the hard way that morning is the best time to harvest. Dew makes the pods extra brittle, ...
- Collection Technique: Use a small paintbrush or your fingers to coax stubborn seeds from pod walls—don't force it! I'...
Frequently asked questions
Got questions about harvesting, storing, or troubleshooting Black Eyed Susan vine seed pods? You’re not alone! Here are the most common queries—and their easy, eco-friendly answers.
When are Black Eyed Susan vine seed pods ready to harvest?
Harvest pods when they’re fully brown and dry but just before they pop open (usually late summer to early fall). If you wait too long, seeds scatter—so check weekly! Pro tip: Gently squeeze a pod; if it feels papery and cracks easily, it’s ready!
How do I store Black Eyed Susan seeds to keep them viable?
Seeds stay fresh for 2–3 years if stored in a cool, dry place (like a sealed envelope or jar). Label them with the harvest date! Freeze-dried method: Spread pods on paper towels to dry completely, then store in an airtight container with a silica gel packet for extra moisture control.
What if my seed pods won’t pop open naturally?
If pods stay stubbornly closed, try these tricks:
- Freeze them overnight—cold shocks can trigger the pop!
- Place them in a paper bag and shake gently for a few days.
- Use a hair dryer on low heat to dry them further (supervise closely!).
Can I use Black Eyed Susan seeds from store-bought flowers?
Probably not! Store-bought flowers are often hybrids or treated with chemicals, so their seeds may not grow true to form. Solution: Grow your own vine from saved seeds or buy open-pollinated varieties from seed banks for reliable results.
What’s a good alternative if I don’t want to deal with seed pods?
Try root cuttings! In early spring, snip a healthy stem, remove lower leaves, and plant it in moist soil. Keep it humid (use a plastic bag!) until roots form (~4–6 weeks). Bonus: This method skips the seed-saving step entirely!
Wrapping up and next steps
Saving seeds from black-eyed Susan vine seed pods is a rewarding way to embrace zero-waste gardening while ensuring next year’s vibrant blooms! 🌱 With just a few simple steps—like drying, popping, and storing—you can effortlessly propagate these cheerful flowers.
Whether you’re a seasoned gardener or a curious beginner, this method is your ticket to low-cost, sustainable growth.
Ready to dive in? Grab a pair of scissors and a paper bag—your future garden awaits! 🌿 Review the supplies or check out common questions before you start.