
Lawn
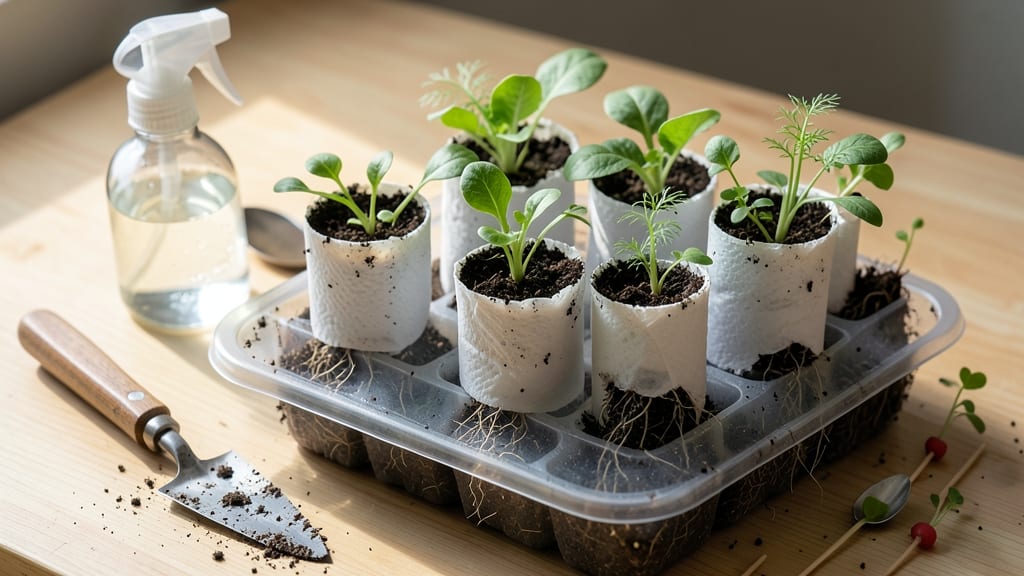
Toilet paper seed starters turn household trash into thriving seedlings in just 60 days—and I've saved over $50 on transplants using this method. 🌱 The best part? You're repurposing something you already have while giving seedlings a perfect head start before transplanting.
You'll need empty toilet paper rolls, potting soil, seeds, and a tray or container for drainage. Cut the rolls into 3-inch sections, fill with moist soil, and plant your seeds right through the cardboard—no peeling required.
This system works especially well for fast-growing plants like lettuce, radishes, and herbs, but even tomatoes and peppers get a strong start. What you end up with is sturdy seedlings ready for the garden, their roots already accustomed to being handled.
The cardboard breaks down naturally, so you can plant the whole roll straight into the soil without disturbing delicate roots. Plus, you'll cut plastic waste and save money every season. Perfect for beginners, urban gardeners, or anyone looking to reduce waste.
Here's how to get started without a single extra purchase—just seeds and what you've already got at home.
📚 In This Guide
- What you need
- Instructions
- Tips and common mistakes
- Wrapping up and next steps
What you need
- ● Toilet paper rolls: 5–10 empty, clean rolls (unbleached or recycled preferred).
- ● Seeds: Fast-growing varieties like radishes, lettuce, or herbs (check seed packets for sprouting times).
- ● Potting soil: 1–2 bags of seed-starting mix (sterile, well-draining).
- ● Scissors or knife: For trimming rolls to size (if needed).
- ● Watering can or spray bottle: With a fine mist setting.
- ● Biodegradable mesh or coffee filters (to cover seeds and retain moisture).
- ● Plant markers (to label seeds by type).
- ● Twine or rubber bands (to secure mesh in place).
- ● Tray or shallow container (to hold rolls while sprouting).
- ● Grow lights (if starting indoors before transplanting).
- ● A sunny spot (indoors or outdoors) with at least 4–6 hours of light daily.
- ● Patience—most seeds sprout in 7–14 days, but some take up to 60!
- ● Zero-waste mindset (because you’re about to upcycle like a pro).
Step-by-Step instructions for DIY toilet paper seed starters
Here's how to transform empty rolls into a thriving seed-starting system that's both eco-friendly and foolproof.
🌱 Step 1: Prepare Your Toilet Paper Rolls for Planting
Start by cutting each empty toilet paper roll into 4-inch sections—this gives you space for multiple seeds per roll. Rinse the rolls thoroughly with warm water to remove any residual paper fibers that could inhibit seed germination. I like to soak them for 10 minutes in a 1:4 vinegar-to-water solution to sterilize completely, then rinse again.
Once clean, stand the roll sections upright in a shallow tray or container. Fill each roll with moistened seed-starting mix, pressing gently to remove air pockets but not compacting too tightly. The mix should feel like a damp sponge—squeeze it to test. If water drips out, it's too wet; if it crumbles, add more moisture.
🌱 Step 2: Plant Seeds at the Correct Depth
For most seeds, aim to plant them at a depth of twice their diameter—this ensures they have enough energy to push through the soil without being buried too deep. I like to use a toothpick to poke a small hole in the center of the soil-filled roll, then drop 1-2 seeds into each hole. Cover them lightly with a pinch of soil, just enough to obscure the seed but not bury it completely.
Place the planted rolls in a clear plastic bag or cover the tray with plastic wrap to create a mini greenhouse effect. This traps warmth and moisture, which speeds up germination. Seal the bag loosely—you want airflow to prevent mold, but enough humidity to keep the soil consistently moist. Place the tray in a warm spot (70-75°F) like on top of the fridge or near a sunny window.
💧 Step 3: Monitor Germination and Provide Light
Check the rolls daily for the first signs of sprouts, which should appear in 5-14 days depending on the seed type. Once you see the first true leaves (not the initial seed leaves), remove the plastic cover immediately to prevent damping-off disease. This is the moment that matters: too much humidity now will rot delicate seedlings.
Move the rolls to a bright, indirect light source—a south-facing window or under a grow light positioned 2-3 inches above the seedlings. You'll notice leggy growth if the light is too far away, so adjust the height as the seedlings grow. Rotate the rolls a quarter turn daily to ensure even growth toward the light source.
☀️ Step 4: Transplant Seedlings to Soil or Larger Containers
When seedlings develop 3-4 true leaves (usually after 4-6 weeks), they're ready to graduate from their toilet paper rolls. Gently squeeze the sides of the roll to loosen the soil root ball, then slide the seedling out by pressing on the bottom. You'll see a dense network of roots—this is your reward for using the toilet paper method!
Transplant the seedlings into individual pots or directly into the garden, burying them to the same depth they were in the rolls. Water deeply after transplanting to help the roots establish. If you're moving them outdoors, do it on an overcast day or in the late afternoon to reduce transplant shock. Keep the soil consistently moist for the first 2 weeks to encourage root growth.
🌿 Step 5: Maintain and Harvest Your Zero-Waste Plants
Once transplanted, care for your seedlings as you would any other plant. Water at the base (not overhead) to keep leaves dry and prevent disease. Fertilize lightly with a balanced liquid fertilizer (diluted to half strength) every 2-3 weeks to support growth. You'll love how sturdy these seedlings are—the toilet paper method encourages strong root development from the start.
Harvest herbs like basil or lettuce by snipping leaves from the outer edges to encourage bushier growth. For vegetables like tomatoes or peppers, wait until the plants are fully mature before picking. The beauty of this method is that you can reuse the same approach for multiple planting cycles—just compost the rolls after use!
Tips & tricks for perfect toilet paper seed starters
These clever tricks will help you maximize your zero-waste seed-starting system and grow thriving plants from recycled materials.
Sterilization Secret: The 10-minute vinegar soak in Step 1 isn't just about cleaning—it eliminates harmful bacteria that could stunt seed growth. For extra peace of mind, especially with heirloom or organic seeds, extend the soak to 15 minutes using a 1:5 vinegar-to-water ratio (still mild enough to be safe). This creates the perfect sterile canvas for your seeds to thrive. The warm water rinse afterward removes any vinegar residue that could affect germination.
Soil Moisture Mastery: When filling your rolls in Step 1, aim for soil that's damp enough to hold together when squeezed but not dripping wet. I find using a spray bottle to mist the seed-starting mix before filling the rolls helps achieve that perfect "damp sponge" consistency without over-saturating. This prevents both waterlogging (which causes rot) and dry pockets that seeds can't penetrate. Think of it as Goldilocks soil—just right for optimal germination.
Germination Timing: The 5-14 day germination window in Step 3 can feel like an eternity! To track progress more precisely, label each roll with the seed type and planting date using a toothpick and permanent marker. Some seeds like basil germinate in just 5-7 days, while others like tomatoes may take up to 14 days. This helps you adjust care routines—like when to remove plastic covers—based on actual seed behavior rather than guesswork.
Transplanting Technique: When your seedlings reach the 3-4 true leaves stage in Step 4, the gentle squeeze-and-slide method works wonders for preserving those delicate root networks. For particularly stubborn seedlings, I recommend running a butter knife vertically along the inside of the roll before squeezing. This creates a clean separation plane that makes extraction effortless. The key is patience—rushing can break those vital roots you've worked so hard to develop.
Pro Tips for Toilet Paper Seed Starters
- These clever tricks will help you maximize your zero-waste seed-starting system and grow thriving plants from recycled materials.
- Sterilization Secret: The 10-minute vinegar soak in Step 1 isn't just about cleaning—it eliminates harmful bacteria that could stunt seed growth.
- Soil Moisture Mastery: When filling your rolls in Step 1, aim for soil that's damp enough to hold together when squeezed but not dripping wet.
Frequently asked questions
Got questions about reviving old toilet paper rolls into thriving seed starters? We’ve got answers! Here are some of the most common queries—plus quick tips to keep your eco-friendly gardening on track.
Can I use any kind of toilet paper for seed starters?
Yes, but opt for unbleached, 100% recycled toilet paper—it’s seed-safe and breaks down naturally. Avoid scented or dyed rolls, as chemicals may inhibit germination. If you’re unsure, test a small batch first!
How long does it take for seeds to sprout in toilet paper?
Timing varies by seed type, but most sprouts (like alfalfa or radish) appear in 3–7 days with proper moisture and warmth. Vegetable seeds (tomatoes, peppers) may take 7–21 days. Check your seed packet for exact estimates!
Do I need to keep the toilet paper roll wet the whole time?
Keep the roll consistently damp (not soggy!) by misting 1–2 times daily. Overwatering can cause mold—aim for a moist but not dripping environment. A clear plastic bag with holes works great for humidity control.
What if my seeds don’t sprout? Troubleshooting tips?
Try these fixes:
- Check warmth: Seeds need 70–85°F—place rolls near a sunny window or use a heat mat.
- Test moisture: Press the toilet paper; it should feel like a wrung-out sponge.
- Verify seeds: Old or low-quality seeds may fail—swap in fresh ones if needed.
- Light exposure: Some seeds (like peas) need darkness to germinate; cover with another layer of damp paper.
Are there alternatives to toilet paper for seed starters?
Try these zero-waste swaps:
- Shredded newspaper or office paper (untinted)
- Burlap sacks or coffee filters
- Coconut coir or peat moss (for larger seeds)
- Egg cartons or paper towels (cut into strips)
Just ensure materials are seed-safe and free of chemicals.
Wrapping up and next steps
Transforming empty toilet paper rolls into thriving seed starters is more than just a clever hack—it’s a sustainable way to nurture your lawn or garden while reducing waste. 🌱 With just a little patience and care, you’ll see those tiny seeds grow into strong plants in just 60 days.
Ready to take the next step? Grab a roll, some seeds, and start your zero-waste gardening journey today—your future garden will thank you!
Pro tip: Share your progress with fellow green thumbs for extra motivation! 🌟