
Propagation
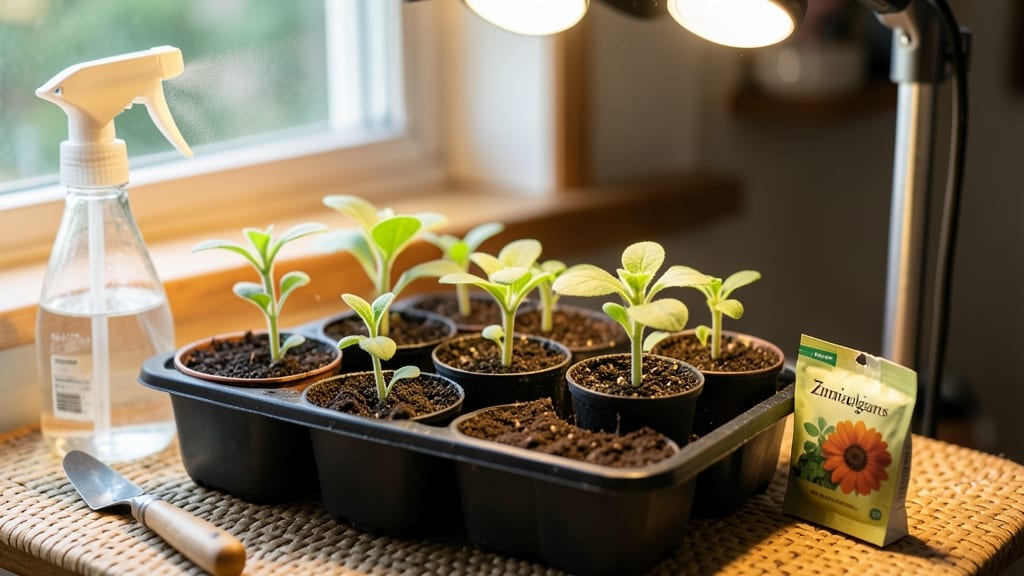
Starting zinnias from seed indoors guarantees 60 days of bold blooms before your first frost—no nursery plants needed. 🌻 I’ve grown zinnias from seed for years, and the secret to avoiding leggy, weak seedlings lies in light, timing, and a little patience.
Most people rush the process, but zinnias reward careful starters with vibrant, long-lasting flowers that outshine store-bought plants. The setup is simple: 3-inch pots, a sunny windowsill or grow light, and a mix of potting soil and perlite to keep roots happy.
Plant seeds just ¼-inch deep, water gently, and keep the soil warm—zinnias hate cold drafts. Within 7-10 days, you’ll see those first green shoots, and if you provide 12-16 hours of light daily, they’ll grow stocky and strong, not stretched-out and sad.
By the time you transplant them outdoors, your zinnias will be thriving, not struggling to catch up. The payoff? A garden bursting with color from mid-summer to frost, with blooms that attract butterflies and hummingbirds all season. No more wilting nursery plants—just bold, reliable blooms you grew yourself.
Works for any indoor space, from bright kitchens to basement setups with grow lights. Let’s get those seeds started right!
📚 In This Guide
- What you need
- Instructions
- Tips and common mistakes
- Wrapping up and next steps
What you need
- ● Zinnia seeds: Choose heirloom or hybrid varieties (e.g., ‘Benary’s Giant’, ‘Crystal’, or ‘Profusion’). Start with 3–5 seeds per 2–3 inch pot for better germination rates.
- ● Seed-starting mix: A lightweight, sterile potting mix (e.g., Pro-Mix or FoxFarm Seedling Mix). Avoid garden soil—it’s too dense!
- ● Containers: 2–3 inch diameter pots (biodegradable or plastic) or a seed tray with cell inserts (1–2 inches deep). Ensure they have drainage holes!
- ● Grow lights or sunny windowsill: Zinnias need 12–16 hours of light daily. A full-spectrum LED grow light (e.g., SPIDER FARM LED) works best if natural light is limited.
- ○ Heat mat (optional but helpful): A seedling heat mat (set to 70–75°F) speeds up germination, especially in cooler climates.
- ● Misting bottle or spray nozzle: For gentle watering to avoid disturbing seeds.
- ● Plastic wrap or humidity dome: Keeps moisture in until seeds sprout (remove once germination starts!).
- ● Fertilizer: A balanced, water-soluble fertilizer (e.g., Jack’s Classic 20-20-20) diluted to half-strength for seedlings.
- ● Small hand trowel or spoon: For gently pressing seeds into the soil.
- ● Toothpicks or chopsticks: Helpful for carefully lifting seedlings during transplanting.
- ● Labels and marker: Track varieties and planting dates!
- ○ Fan (optional): A small oscillating fan on low strengthens seedlings by mimicking wind.
- ● Hardening-off tray (for later): A shallow tray for acclimating seedlings to outdoor conditions before transplanting.
Step-by-Step instructions for starting zinnias from seed indoors
Here's how to get vibrant zinnias blooming in just 60 days—even if your growing season feels short.
🌱 Step 1: Prepare Seed Trays and Mix
Fill your seed trays with sterile seed-starting mix (never garden soil—it's too dense and may harbor fungus). I press the mix down lightly with my fingers to create a firm, even surface. This prevents seeds from sinking too deep, which slows germination. Wet the mix thoroughly until it feels like a damp sponge—no puddles, just consistent moisture.
Zinnia seeds are tiny, so I use a fine-mesh strainer to sift the mix over the tray for an even planting surface. Tap the tray gently on the table to settle everything. A level surface ensures seeds won't roll into clumps where they might rot. This is where precision matters most—uneven planting leads to uneven growth later.
🌱 Step 2: Sow Seeds at the Right Depth
Scatter seeds sparingly—about 1/8 inch apart—since zinnias germinate quickly and can get crowded. I use a toothpick to space them evenly, as my fingers are too clumsy for such small seeds. Press each seed just 1/16 inch deep into the mix (about the thickness of a credit card). Covering them too deeply delays sprouting, while leaving them exposed risks drying out.
Mist the tray with a spray bottle until the surface looks uniformly damp but not soggy. I avoid overhead watering—it washes seeds together or buries them too deep. Once seeds are planted, I label the tray with the date and variety. Zinnias grow fast, and you'll forget which batch you started if you don't keep track.
💧 Step 3: Provide Warmth and Humidity
Cover the tray with a clear plastic dome or plastic wrap to trap warmth and moisture. Zinnias germinate best at 70-75°F, so I place the tray on a seedling heat mat set to 75°F. Without heat, germination can take 10-14 days instead of the 5-7 days I see with warmth. Check daily for condensation—if the dome fogs up, lift it briefly to air out the seeds.
Keep the tray in bright, indirect light (no direct sun yet—it overheats the seeds). You'll notice the first sprouts in 3-5 days as tiny green hooks breaking through the soil. Once 50% of seeds have sprouted, remove the dome immediately—trapped humidity invites damping-off, a fungal disease that collapses seedlings overnight.
☀️ Step 4: Move to Strong Light Immediately
The instant seedlings appear, they need 14-16 hours of light daily. I switch to a full-spectrum LED grow light mounted 2-3 inches above the tray. Without enough light, zinnias stretch leggy (long, weak stems) and flop over. You'll see strong seedlings with thick stems and dark green leaves spaced closely together.
Rotate the tray quarter-turn daily so plants grow straight toward the light, not lopsided. If you notice leaves turning pale or stems elongating toward the light, the fixture is too far away. Adjust until leaves are bold and upright—this ensures sturdy plants ready for transplanting in 4-6 weeks.
✂️ Step 5: Thin and Harden Off
When seedlings have 2-3 true leaves (the first set are cotyledons), thin to 1 plant per cell using clean scissors. Snip at soil level to avoid disturbing roots. I save the thinnings for compost—they're still viable and won't waste. Water gently after thinning to settle the soil around remaining plants.
Two weeks before your last frost, start hardening off by placing trays outside in partial shade for 1 hour daily. Gradually increase time to full sun over 7-10 days. Watch for wilting—if leaves droop, the plants aren't ready. Once hardened, zinnias tolerate transplanting like pros, with minimal shock.
Tips & tricks for perfect zinnia seedlings indoors
These game-changing tips will help you avoid common pitfalls and get those zinnias blooming like clockwork—even if your growing conditions aren't ideal.
Precision Planting: In Step 1, when pressing down that sterile seed-starting mix, think of it like creating a smooth canvas for your seeds. Use the back of a spoon to gently press the mix to the same level across the entire tray—this prevents seeds from rolling into uneven pockets. I've learned the hard way that even tiny variations in depth can cause seeds to germinate at different rates, leading to uneven seedlings. A perfectly level surface also helps prevent damping-off by ensuring proper airflow.
Seed Spacing Secret: Those 1/8-inch spacing guidelines in Step 2 might seem tight, but trust me—zinnias germinate fast and can get crowded quickly. Use a toothpick to create tiny divots for each seed, then press it just 1/16-inch deep. This creates perfect little seed beds that won't collapse when you water. Pro tip: If you're planting multiple trays, I like to use a small piece of painter's tape with parallel lines spaced 1/8-inch apart as a guide—it makes spacing seeds feel less like guesswork and more like precision engineering.
Lighting Strategy: The 14-16 hours of daily light in Step 4 is non-negotiable for sturdy zinnias, but here's what nobody tells you: LED grow lights lose intensity over time. I check mine every 2 weeks by holding a piece of white paper under the fixture—if the light creates a shadow with visible texture, it's still strong. If the paper looks uniformly gray, it's time for a new bulb. Also, position your light so the top of seedlings just brushes the fixture—this creates the perfect balance between strong growth and preventing leggy stems.
Hardening Off Hack: When you're hardening off in Step 5, start with that 1 hour of partial shade, but here's the real trick: place your tray on a small stool or block so it's slightly elevated. This prevents water from pooling at the base of seedlings when you bring them inside after their outdoor session. I also like to mist the leaves lightly with water before returning them to the house—this mimics morning dew and helps them recover faster from the transition.
Pro Tips for Zinnias From Seed Indoors
- These game-changing tips will help you avoid common pitfalls and get those zinnias blooming like clockwork—even if your growing conditions aren't ideal.
- Precision Planting: In Step 1, when pressing down that sterile seed-starting mix, think of it like creating a smooth canvas for your seeds.
- Seed Spacing Secret: Those 1/8-inch spacing guidelines in Step 2 might seem tight, but trust me—zinnias germinate fast and can get crowded quickly.
Frequently asked questions
Got questions about growing zinnias from seed indoors? You’re not alone! Here are answers to the most common queries—from timing tricks to troubleshooting tips—to help you succeed with your cold-stressed blooms.
When is the best time to start zinnias indoors?
Start seeds 6–8 weeks before your last frost date. Since zinnias thrive in cooler weather, aim for early spring (February–March in most zones). If you’re in a short-season area, you can even try a second indoor batch in late summer for fall blooms!
Do zinnias need light indoors, or will my seed tray work?
Zinnias crave light—place trays under grow lights (14–16 hours/day) or a sunny south-facing window. Without enough light, seedlings will get leggy (tall and weak). A simple LED bulb or fluorescent light 2–3 inches above the tray works wonders!
Why are my zinnia seedlings dying after germination?
Common culprits: overwatering (soggy soil = rot), cold drafts (keep temps 65–75°F), or dampness (thin seedlings to 1 inch apart). If leaves turn yellow or mold appears, reduce watering and improve airflow with a small fan. Damping off? Sprinkle cinnamon on soil to fight fungus!
Can I grow zinnias indoors without a greenhouse setup?
Skip the greenhouse and use clear plastic domes or even a repurposed shoe box with plastic wrap for humidity. Just remember to ventilate daily after seeds sprout. For lighting, a DIY grow light (like a T5 fluorescent bulb) on a timer works perfectly for $20 or less.
How do I harden off zinnia seedlings before transplanting?
Start 1–2 weeks before moving outdoors: place seedlings in a shady, sheltered spot (like a porch) for 1–2 hours daily, gradually increasing time. By day 7, they should handle 6+ hours of direct sun. Avoid hardoff-ing on windy days—zinnias are tough but not windproof!
What’s the fastest way to get zinnias to bloom indoors?
Boost blooms with 12-hour light cycles (even artificial light) and cool nights (55–60°F). Pinch back flower buds when seedlings are 6 inches tall to encourage bushier growth. For extra speed, use a balanced fertilizer (10-10-10) lightly when true leaves appear.
Wrapping up and next steps
Growing zinnias from seed indoors is a rewarding journey that delivers vibrant blooms in just 60 days—even if your climate is chilly! With the right tools, patience, and a little care during cold-stressed germination, you’ll unlock a burst of color for your garden. You’ve got this! 🌱
Now that you’re armed with tips and answers, take the next step: start your seeds today! Grab your supplies, follow the steps, and soon you’ll be pinching back those seedlings and prepping for transplant. Happy growing—your future garden awaits! 🌸