
Propagation
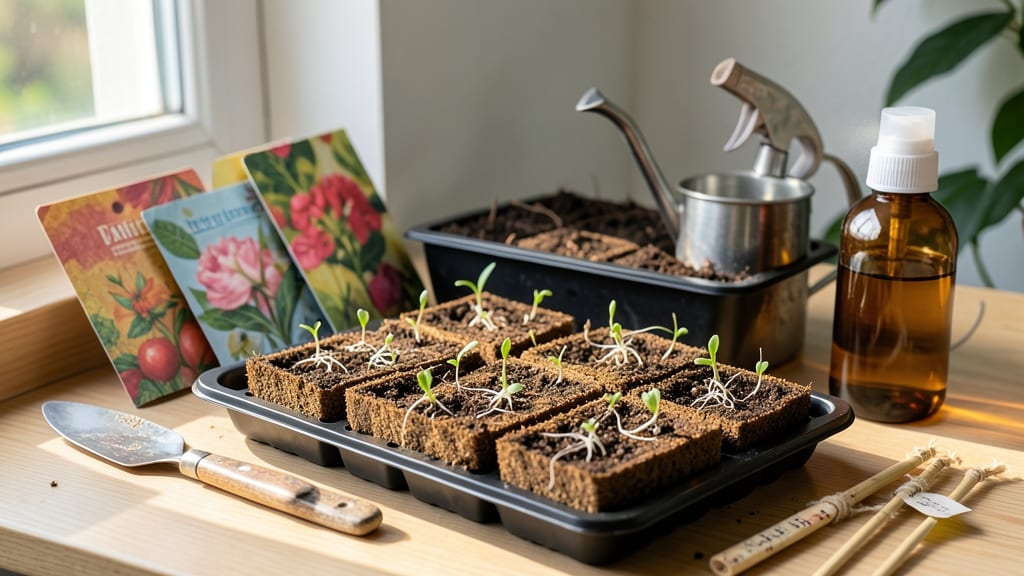
Starting seeds in soil blocks cuts germination time by half—no transplant shock, no wasted roots. 🌱 I switched after watching my seedlings flop during transplanting, and now my greens pop up in days instead of weeks, with roots that thrive instead of struggling.
The magic is in the blocks themselves: compressed soil cubes that mimic nature’s perfect starter environment. You’ll need a soil block maker (or DIY molds), organic potting mix, and a shallow tray—no fancy equipment.
The blocks stay moist longer than seedling trays, and you can pop them straight into the garden when ready. What you end up with is stocky, dark-green seedlings ready to outpace anything from a store.
No more delicate roots breaking during transplanting, no more wasted seedlings—just fast, foolproof growth from the get-go. Works for any seed, from tiny herbs to sprawling tomatoes. Here’s how to set it up right the first time.
📚 In This Guide
- What you need
- Instructions
- Tips and common mistakes
- Wrapping up and next steps
What you need
- ● Soil blocks: 1-2" diameter (or size matching your seedling needs); clay or coconut coir-based (e.g., blank">Enviro Blocks or DIY mixes). Pro tip: Pre-make a batch—store in a sealed container for up to 3 months!
- ○ Seeds: Choose fast-germinating varieties (e.g., lettuce, basil, or marigolds). 💡 Optional: Seedling heat mat ($10–$20) for cold starts.
- ● Water: Room-temperature, dechlorinated (let tap water sit 24 hours or use rainwater).
- ● Humidity dome: Clear plastic lid (from a takeout container) or a blank">mini greenhouse kit ($5–$15).
- ● Flat tray: Shallow container (e.g., baking sheet, plastic bin) with drainage holes.
- ● Spray bottle: 8–16 oz for gentle watering (avoid over-saturating!).
- ● Label markers: Toothpicks + waterproof pen (or blank">plant labels).
- ○ Grow lights (optional): LED bulb (e.g., blank">Full Spectrum 6500K) for 12–16 hrs/day if natural light is <10 hrs/day.
- ● Compost/fertilizer: Balanced organic mix (e.g., worm castings) for transplanting.
- ● Dedicated space: Sunny windowsill, basement shelf with grow lights, or a greenhouse.
- ● Patience: Soil blocks need 24–48 hours to rehydrate before seeding!
- ● Clean workspace: Disinfect trays/tools with 10% hydrogen peroxide to prevent mold.
How to start seeds in soil blocks for faster germination
Here's the quick method I use to get seedlings popping in days instead of weeks.
🌱 Step 1: Make or Acquire Soil Blocks
Soil blocks are the secret weapon for fast germination—they're pre-composted, airy, and hold moisture perfectly. If you're making them, mix 1 part compost with 1 part coconut coir or peat moss and add 1 part perlite or vermiculite for structure. The texture should be like damp sand that holds its shape when squeezed.
For store-bought blocks, look for 2-inch diameter cubes—they're perfect for most seeds. Place them on a flat tray and soak them in water for 10-15 minutes until they're evenly moist but not dripping. You'll know they're ready when they feel firm to the touch but still crumble slightly at the edges.
🌱 Step 2: Plant Seeds at the Right Depth
Each seed has its own ideal planting depth, but a good rule is to plant it at a depth 2-3 times its diameter. For tiny seeds like lettuce, just press them into the surface. For larger seeds like beans, make a small dimple with your finger and drop the seed in.
I like to use a toothpick to create the planting hole—it's precise and won't compact the soil block. After planting, give the block a light mist with water until the surface feels damp. This ensures good seed-to-soil contact, which speeds up germination. Place the tray in a warm spot (around 70-75°F) to encourage quick sprouting.
☀️ Step 3: Provide Warmth and Humidity for Germination
The magic happens when you combine warmth and moisture. Cover the tray with clear plastic wrap or a humidity dome to trap heat and moisture. This creates a mini greenhouse effect that can cut germination time in half. Most seeds will sprout in 3-7 days with this method—watch for tiny green tips breaking through the soil surface.
Check daily but don't remove the cover until you see 50% of seeds germinated. This prevents the blocks from drying out too quickly. If condensation forms on the plastic, that's perfect—it means the humidity level is just right. Once you see those first sprouts, remove the cover immediately to prevent damping-off disease.
💧 Step 4: Move to Light and Maintain Moisture
As soon as you see the first true leaves (not just the initial seed leaves), move the blocks to bright, indirect light. I use a grow light on a timer for 14-16 hours daily to prevent leggy growth. Keep the blocks consistently moist by watering from the bottom—place the tray in a shallow dish of water for 10-15 minutes until the blocks feel evenly damp.
You'll know the moisture is right when the blocks feel firm but not soggy. Overwatering is the biggest mistake here—it causes roots to rot before they can establish. After a week, you'll notice strong, compact seedlings with no need for transplant shock. The beauty of soil blocks is that you can plant them directly into the garden when they're ready.
Tips & tricks for faster seed germination in soil blocks
Here's what nobody tells you about making soil blocks work even better than the instructions promise.
Texture is Everything: When mixing your soil blocks, aim for a consistency like damp sand that holds together when squeezed but crumbles easily at the edges. Too much moisture makes blocks too heavy and prone to cracking, while too little means seeds won't get enough hydration. I test by rolling a small amount between my fingers—it should form a ball that stays intact but breaks apart with gentle pressure. This perfect texture is what lets roots grow freely without restriction.
Warmth Accelerates Germination: That 70-75°F temperature isn't just a suggestion—it's the magic number for fast germination. If your home runs cooler, place the seed tray on top of your fridge (not inside) or use a seedling heat mat for 24 hours after planting. I've seen germination times cut in half when maintaining this warm environment during the critical first 3-5 days. Just don't exceed 80°F or you risk overheating the seeds.
Precision Planting Pays Off: The 2-3 times seed diameter rule works wonders, but here's the secret: use a toothpick to make planting holes just slightly larger than needed. This prevents compacting the soil around delicate roots. For seeds smaller than 1/8 inch, I press them directly into the surface with my finger—just enough to cover them lightly. The key is maintaining that perfect seed-to-soil contact without burying them too deep.
Humidity Management: That 50% germination threshold before removing the cover is crucial—don't rush it! I check daily by lifting the plastic slightly and feeling the blocks. If they're still damp to the touch, wait another day. The condensation on the plastic is your friend—it means you've got perfect humidity levels. Once you see those first sprouts, remove the cover immediately to prevent damping-off disease from setting in.
Pro Tips for Soil Blocks Seed Starting
- Here's what nobody tells you about making soil blocks work even better than the instructions promise.
- Texture is Everything: When mixing your soil blocks, aim for a consistency like damp sand that holds together when squeezed but crumbles easily at the edges.
- Warmth Accelerates Germination: That 70-75°F temperature isn't just a suggestion—it's the magic number for fast germination.
Frequently asked questions
Got questions about soil blocks for seed starting? You’re not alone! Here are answers to the most common queries to help you get started with confidence.
What are the benefits of soil blocks over traditional seed-starting methods?
Soil blocks eliminate transplant shock by keeping roots intact, reduce waste (no pots to toss!), and promote faster germination with better aeration. Plus, they’re lightweight and easy to handle—perfect for small spaces or high-density seedling setups. Win-win for your plants and the planet!
How long does it take for seeds to germinate in soil blocks compared to pots?
Germination times are similar, but soil blocks often speed things up slightly due to consistent moisture and aeration. Most seeds sprout within 5–14 days, depending on the plant type. Monitor soil moisture closely—keep it damp but not soggy!
Can I reuse soil blocks for multiple planting cycles?
Yes! After harvesting your seedlings, let the blocks dry completely, then crush and reuse the soil for new blocks or compost. Pro tip: Sterilize with heat (200°F for 30 mins) to prevent pests/diseases between uses.
What if my soil blocks crack or fall apart when handling?
Cracking usually means the blocks dried too fast or lacked proper compression. Next time, increase moisture slightly (aim for 40–50% water content) and press firmer. Store unused blocks in a sealed bag to retain humidity.
Are soil blocks suitable for all types of plants?
Most veggies, herbs, and flowers thrive in soil blocks, but avoid delicate root systems like orchids or large tubers (e.g., potatoes). For heavy feeders (like tomatoes), add a slow-release fertilizer to the mix. Start with easy seeds like lettuce or basil to test your technique!
Where can I buy soil block makers if I don’t want to DIY?
Check garden centers, online retailers (Amazon, Etsy), or specialty propagation stores. Brands like Seedling Blocks or BioDome offer affordable, durable options. DIY kits (e.g., PVC pipe molds) are also budget-friendly!
Wrapping up and next steps
Starting seeds in soil blocks is a game-changer for gardeners—it’s fast, eco-friendly, and packed with benefits like stronger roots and less waste.
Whether you're a beginner or a seasoned pro, this method simplifies the process while giving your plants the best possible start. Now that you’re ready to dive in, grab your materials and get growing! 🌱✨
Your next step? Experiment with different plants or share your soil block journey with fellow gardeners. Happy planting!