
Lawn
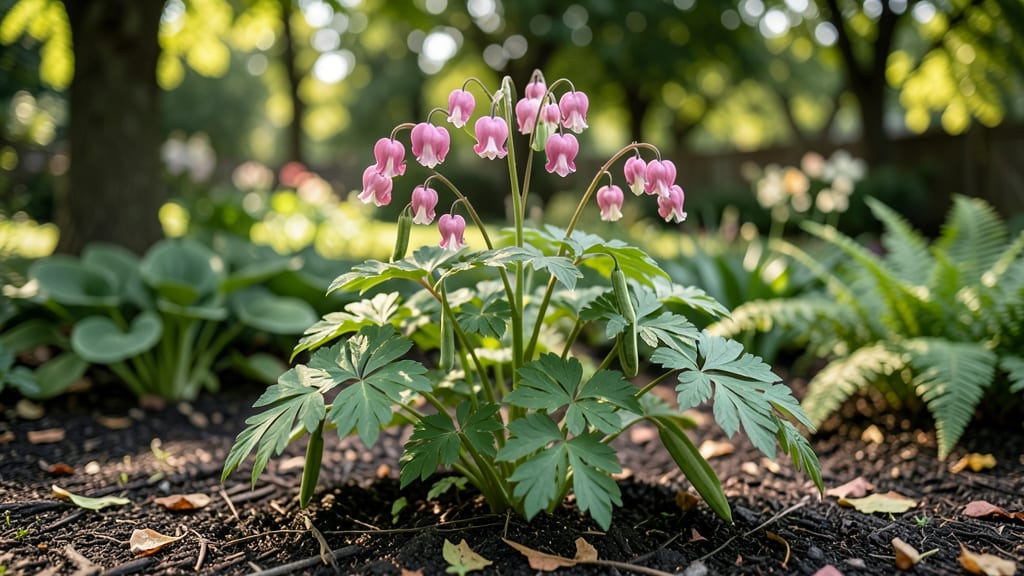
Harvesting bleeding heart seed pods turns last season’s faded blooms into next spring’s heart-shaped surprises. 🌱 The secret to reliable germination lies in cold-stressed seeds—mimicking winter’s natural dormancy to break their stubbornness. I’ve collected hundreds of pods over the years, and the ones I cold-stratify always outperform store-bought seedlings.
Timing is everything: harvest pods when they turn brown and papery, usually in late summer after the flowers fade. Let them dry completely before storing in a paper bag—moisture is the enemy of viability. Most gardeners skip the cold treatment, but that’s why so many struggle with spotty germination.
After 6-8 weeks in the fridge, those seeds will wake up ready to grow. Plant them shallowly in well-draining soil, and within 3-4 weeks, you’ll see tiny seedlings pushing through. The payoff? Plants that bloom reliably for years, with that signature heart-shaped charm you can’t find anywhere else.
This method works for both Dicentra spectabilis and the smaller Dicentra eximia varieties. The key is patience—cold-stratification takes time, but the results are worth every minute. Start now, and you’ll have next spring’s showstopper already growing in your garden.
📚 In This Guide
- What you need
- Instructions
- Tips and common mistakes
- Wrapping up and next steps
What you need
- ● Bleeding heart seed pods – 1–2 packets (or ~50–100 seeds, depending on variety). Choose fresh seeds (collected or store-bought) for best viability.
- ● Cold stratification materials: Refrigerator or cold frame (maintain 35–40°F (2–4°C))
- ● Moistened paper towels or peat moss (for seed pre-treatment)
- ● Zip-top plastic bag or airtight container (to hold moisture)
- ● Growing medium: Seed-starting mix (sterile, well-draining; 1–2 small trays)
- ● Small pots or seedling trays (with drainage holes; 2–4 inches deep)
- ● Watering supplies: Spray bottle (for gentle moisture) or watering can with fine rose
- ○ Misting nozzle (optional, for humidity control)
- ● Grow lights or sunny windowsill (after stratification; 12–16 hours of light/day)
- ○ Heat mat (optional) – Helps speed up germination post-cold treatment (70–75°F (21–24°C))
- ● Humidity dome – Keeps seedlings cozy while germinating.
- ● pH test kit – Ensures your soil is slightly acidic (6.0–7.0) for optimal growth.
- ● Fertilizer – Balanced, water-soluble (e.g., 10-10-10) for post-germination feeding.
- ● Plant labels – Track varieties and planting dates!
- ● Garden journal – Log cold stratification dates and germination progress.
How to germinate bleeding heart seed pods using cold stratification
Cold-stressed germination is the secret to breaking bleeding heart's stubborn dormancy—here's how to do it right.
🌱 Step 1: Harvest and Prepare the Seed Pods
Collect mature seed pods when they turn brown and begin splitting open naturally, usually in late summer or early fall. I like to harvest them just before they release seeds—this gives me control over when germination begins. Place the pods in a paper bag and store them in a cool, dry location for 7-10 days to ensure they're fully dry before processing.
Once dry, open the pods carefully with a small knife or your fingers. You'll find tiny, dark seeds inside—each pod contains 4-6 seeds on average. Remove any debris and discard empty or damaged seeds. This is where precision pays off: only healthy seeds will germinate reliably. I spread them on a clean paper towel to inspect under good light, discarding any that look shriveled or discolored.
❄️ Step 2: Cold-Stratify the Seeds for Dormancy Break
Bleeding heart seeds need 8-12 weeks of cold stratification to mimic winter conditions and trigger germination. Place the seeds in a resealable plastic bag with a small amount of moistened peat moss or vermiculite—just enough to keep everything damp but not soggy. I seal the bag and place it in the refrigerator's crisping drawer (around 35-40°F), where it stays consistently cold without freezing.
Check the seeds every 2-3 weeks to ensure they remain moist. If the peat moss dries out, add a few drops of water and reseal the bag. This cold period is critical—skipping it results in poor or uneven germination. You'll know stratification is working when the seeds begin to swell slightly after 4-6 weeks.
🌱 Step 3: Sow Stratified Seeds in a Controlled Environment
After stratification, fill small seed-starting trays with a sterile, well-draining seed-starting mix. Press the soil down lightly to remove air pockets, then create shallow furrows about ¼ inch deep—just enough to cover the tiny seeds. I use a toothpick to make the grooves, as bleeding heart seeds are so small they're easy to misplace.
Sow the seeds sparingly, spacing them ½ inch apart to avoid overcrowding. Cover them lightly with a thin layer of additional mix, then mist the surface with a spray bottle until evenly moist. Place the trays in a humidity dome or clear plastic bag to retain moisture and warmth. Keep them in a consistently warm location (around 65-70°F) until germination begins, which typically takes 2-4 weeks.
☀️ Step 4: Provide Gentle Light and Gradual Acclimation
Once the first true leaves appear, remove the humidity dome immediately to prevent damping-off. Move the seedlings to a bright, indirect light source—a south-facing window or grow light positioned 4-6 inches above the plants. Bleeding heart seedlings are sensitive to harsh light, so I start with partial shade and gradually increase exposure over 7-10 days to avoid leaf scorch.
Water gently from the bottom of the trays to keep the soil evenly moist but never soggy. You'll notice the seedlings develop lobed leaves characteristic of bleeding heart—this is your signal that they're thriving. After 4-6 weeks, when the seedlings have 3-4 sets of true leaves, they're ready for transplanting into individual pots or the garden.
⏰ Step 5: Transplant and Overwinter for Spring Blooms
Choose a cool, shaded spot in the garden for transplanting, as bleeding heart prefers partial to full shade and rich, moist soil. Dig holes slightly larger than the root balls and space plants 12-18 inches apart to allow for growth. I always add a handful of compost to the planting hole to give the seedlings a nutrient boost.
Water deeply after transplanting and mulch with 2-3 inches of organic mulch to retain moisture and regulate soil temperature. Bleeding heart plants are hardy perennials, but they need time to establish. In their first year, focus on root development—you won’t see blooms until the following spring. This patience pays off with showy, heart-shaped flowers that appear reliably year after year.
Tips & tricks for perfect bleeding heart germination
Here's what nobody tells you about breaking bleeding heart's stubborn dormancy—these details make all the difference.
Pod Maturity Matters: Harvest seed pods when they're fully brown but just beginning to split—this is the sweet spot between freshness and dryness. If pods are still green, they won't have mature seeds; if they've already released seeds, you've missed the window. I've learned this the hard way after wasting entire seasons on premature or overripe pods. The 7-10 day drying period is non-negotiable—it ensures seeds are fully dehydrated and ready for stratification.
Stratification Precision: The 35-40°F temperature range in your fridge's crisper drawer is ideal, but consistency is key. I recommend placing a thermometer in the bag during stratification to verify conditions—some fridges fluctuate wildly. The seeds should remain moist but never soggy; I use a spray bottle to mist them every 2-3 weeks rather than soaking. You'll know it's working when seeds swell noticeably after 4-6 weeks—this is your signal that dormancy is breaking.
Sowing Technique: Those tiny seeds are easily misplaced, so precision matters. I create furrows with a toothpick rather than fingers, and I use a fine misting bottle to avoid disturbing them. The ¼-inch depth is crucial—too deep and they won't emerge, too shallow and they'll dry out. After sowing, I gently press the soil around the seeds with my finger to ensure good contact without compacting it. This careful placement pays off when seedlings emerge uniformly.
Light Transition Strategy: Bleeding heart seedlings are light-sensitive, so gradual acclimation is essential. Start with partial shade for the first 7-10 days after germination, then slowly increase exposure. I use a sheer curtain over my south-facing window to diffuse light initially. Watch for leaf scorch—if edges turn brown, you've moved them too quickly. The goal is to harden off seedlings over 4-6 weeks before transplanting, ensuring they're ready for garden conditions.
Pro Tips for Bleeding Heart Seed Pods
- Here's what nobody tells you about breaking bleeding heart's stubborn dormancy—these details make all the difference.
- Pod Maturity Matters: Harvest seed pods when they're fully brown but just beginning to split—this is the sweet spot between freshness and dryness.
- Stratification Precision: The 35-40°F temperature range in your fridge's crisper drawer is ideal, but consistency is key.
Frequently asked questions
Got questions about bleeding heart seed pods and their quirky germination habits? You’re not alone! Here’s a quick guide to the most common concerns—plus practical solutions to keep your spring blooms thriving.
Why do bleeding heart seeds need cold stratification?
Bleeding heart seeds (Dicentra spectabilis) are dormant by nature—they need a cold, moist period (like winter) to break dormancy. Without it, germination rates plummet. Think of it as a natural "reset button" that mimics their native woodland environment. Skip this step, and you might wait years for blooms!
How long should I cold-stratify bleeding heart seeds?
Most gardeners use the moist-chill method: Place seeds in a sealed bag with damp peat moss or paper towels, then refrigerate for 6–8 weeks. For extra reliability, extend to 10–12 weeks, especially in warmer climates. Pro tip: Label your bag with the date to track progress!
Can I stratify seeds outside instead of in the fridge?
Outdoor stratification
works too—just sow seeds in fall (before frost) in a protected spot (like a shaded garden bed or under mulch). They’ll naturally experience winter’s cold and moisture. Just ensure the soil stays consistently damp (not soggy) until spring. Perfect for hands-off gardeners!
My bleeding heart seeds sprouted too early—what now?
If seeds germinate before stratification (e.g., in a warm fridge), they’re often weak or leggy. Don’t despair! Transplant them into pots with moist potting mix and place them back in the fridge for 2–4 more weeks. Once cold-stratified, they’ll toughen up. If they’re already stretched, try burying them deeper in soil to encourage sturdy growth.
Are there alternatives if stratification fails?
Yes! If your seeds refuse to cooperate, consider:
- Buying pre-stratified seeds from reputable nurseries (check labels!).
- Grafting or dividing mature plants (bleeding hearts spread via rhizomes).
- Opting for cuttings from a friend’s plant in early spring.
Wrapping up and next steps
Cold-stressed bleeding heart seed pods offer a foolproof way to unlock vibrant spring blooms with minimal fuss—perfect for gardeners eager to beat the rush!
By mimicking nature’s chilly prep work, you’ll skip the wait and enjoy lush, healthy plants year after year. Your garden’s next masterpiece starts with a little patience and a fridge!
🌱 Ready to Grow?
Grab your supplies, follow the steps, and watch those delicate blooms take center stage. Next up: Plan your planting spots in partial shade and prep the soil for a show-stopping display. Happy gardening! 🌸