
Lawn
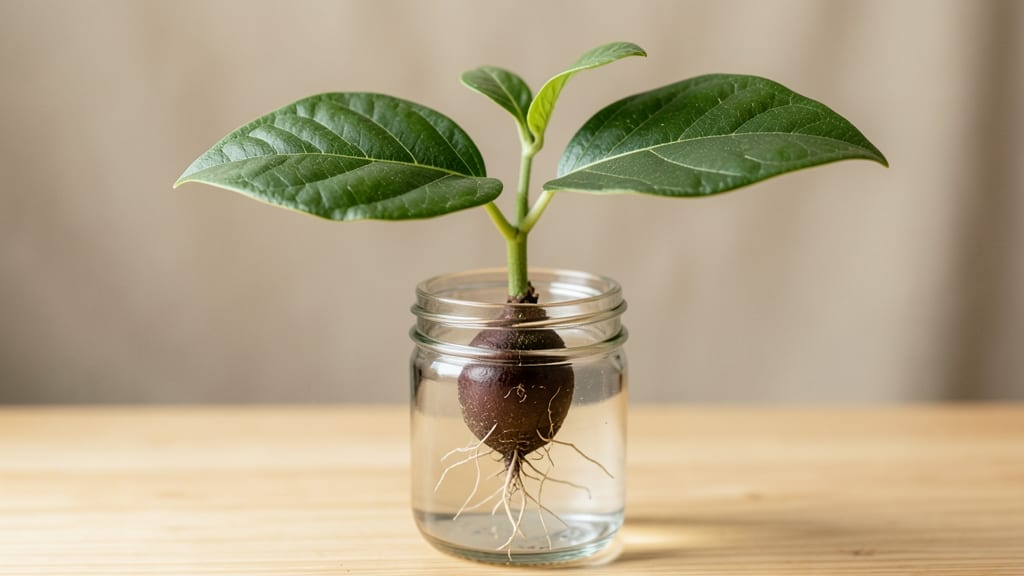
Sprouting an avocado seed isn’t just zero-waste—it’s a living lesson in patience that rewards you with a lush, leafy houseplant. ✨ I’ve watched my kitchen countertop transform from a forgotten pit to a thriving 3-foot-tall tree over two years, and the process is simpler than most people think.
All you need is a seed, a glass, toothpicks, and a little water. The key is keeping the seed moist without drowning it—think damp paper towel, not soggy sponge. Most seeds sprout roots within 2-4 weeks, but don’t rush it; avocados grow on their own timeline.
Once those roots hit 4-6 inches, you’ll transplant into soil and watch the stem emerge. The real magic happens when you see the first true leaves—bright green and glossy—a sign your plant is thriving. Mold or rot? Just adjust moisture and air flow.
This isn’t just a plant—it’s a conversation starter. My neighbors now ask about my "avocado tree" every time they visit, and the best part? You’re not just growing a plant; you’re growing something that could one day bear fruit.
📚 In This Guide
- What you need
- Instructions
- Tips and common mistakes
- Wrapping up and next steps
What you need
- ● 1 ripe avocado – Choose a firm but soft pit for easier sprouting.
- ● 1 sharp knife or avocado pit remover – For safely extracting the seed.
- ● Toothpicks (3-4) – To suspend the seed over water.
- ● Small glass or jar (8-12 oz) – For holding water and the seed.
- ● Water (room temperature) – Enough to cover 1-2 inches of the seed’s base.
- ● Paper towels or coffee filters – To keep the seed moist once roots sprout.
- ○ Spray bottle (optional but helpful) – For gentle misting as the plant grows.
- ● Potting soil (well-draining mix) – For transplanting once roots are 2-3 inches long.
- ● Small pot (4-6 inches in diameter) – With drainage holes to prevent root rot.
- ● Humidity dome or plastic wrap – To create a mini greenhouse effect.
- ● Grow lights or sunny windowsill – If natural light is limited.
- ● Fertilizer (balanced liquid or compost tea) – Once the seedling is established.
Step-by-Step instructions for growing avocado seedlings
Here’s how to turn your avocado pit into a thriving seedling—no special tools needed.
🌱 Step 1: Prep the Seed for Faster Germination
Rinse the avocado pit thoroughly under warm water to remove any remaining fruit. I like to scrub it gently with my fingers to clean off all residue—this prevents mold later. Place the pit on a paper towel and let it dry completely for about 24 hours. A damp pit won’t germinate well, so patience here pays off.
Once dry, insert 3-4 toothpicks evenly around the pit, spacing them about ½ inch apart from the top. The toothpicks should hold the pit steady without piercing the skin too deeply. This setup lets you suspend the pit over water without it sitting directly in it—critical for avoiding rot.
💧 Step 2: Suspend the Pit Over Water
Fill a shallow container (like a small bowl) with 2-3 inches of room-temperature water. Gently lower the toothpick-equipped pit so the bottom half (where the stem would grow) sits in the water, but the top half remains dry. The water should cover about ⅓ of the pit’s height—any more risks soggy conditions.
Place the container in a warm spot with indirect light, like a kitchen counter near a window but not in direct sun. You’ll see the first signs of growth in 2-6 weeks, depending on your home’s warmth. Watch for a small bump forming near the top—this is the root pushing through!
☀️ Step 3: Encourage Root and Shoot Growth
Once roots reach about 2-3 inches long, it’s time to transition to soil. Fill a small pot (at least 4 inches deep) with well-draining potting mix. I like to mix in a little perlite to keep the roots from sitting in wet soil. Make a hole in the center and gently place the pit so the roots spread downward, with the top half above soil.
Water lightly until the soil feels damp but not soggy. Keep the pot in bright, indirect light for the first week—direct sun can scorch the delicate new leaves. You’ll notice the first true leaves appear in 4-8 weeks, signaling healthy growth. This is when the real fun begins!
🌿 Step 4: Care for Your Seedling Long-Term
After the first leaves emerge, move the seedling to a spot with 4-6 hours of morning sun daily. Too much direct sun too soon will yellow the leaves. Water when the top inch of soil feels dry, but avoid letting the soil stay soggy—avocado seedlings hate wet feet.
Fertilize lightly every 2 months with a balanced, water-soluble fertilizer (like 10-10-10) diluted to half-strength. Over-fertilizing burns young roots. With patience, your seedling will grow into a small tree—though it may take years to bear fruit. The journey is the reward!
Tips & tricks for perfect avocado seed sprouting
Here's what I learned the hard way after watching my first few avocado pits rot instead of sprout.
Cleanliness is Key: In Step 1, don't just rinse the pit—scrub it thoroughly with your fingers to remove all fruit residue. I used to skip this, and mold would grow within days. A clean pit gives you a clean start, and that 24-hour drying time is non-negotiable. Place it on a paper towel in a well-ventilated spot to prevent any lingering moisture.
Toothpick Placement Matters: When inserting your 3-4 toothpicks in Step 1, space them evenly around the pit's equator, not the top. I learned this after my first attempt had toothpicks too high, making the pit unstable. The toothpicks should create a stable cradle that lets the bottom half sit comfortably in water while keeping the top dry—this balance is crucial for avoiding rot.
Water Level Watch: In Step 2, maintain that ⅓-submersion level religiously. Too much water (covering more than ⅓) creates soggy conditions that rot the pit, while too little (less than ⅓) prevents proper root development. I keep a small ruler nearby to check the water level weekly—this simple habit saved my second attempt from failure.
Light Transition Strategy: When moving your seedling to soil in Step 3, keep it in indirect light for that first critical week. Direct sun at this stage will scorch the delicate new leaves. I place my seedlings near an east-facing window where they get bright but filtered light. After the first true leaves appear, you can gradually introduce more direct morning sun.
Pro Tips for Avocado Seed Sprouting
- Here's what I learned the hard way after watching my first few avocado pits rot instead of sprout.
- Cleanliness is Key: In Step 1, don't just rinse the pit—scrub it thoroughly with your fingers to remove all fruit res...
- Toothpick Placement Matters: When inserting your 3-4 toothpicks in Step 1, space them evenly around the pit's equator...
Frequently asked questions
Got questions about sprouting avocado seeds?
You’re not alone! Here are answers to the most common queries to help you grow your own zero-waste plant with confidence.
How long does it take for an avocado seed to sprout?
Patience is key! Most avocado seeds take 2–6 weeks to sprout, depending on warmth, humidity, and care. Keep the toothpicks moist (not soggy) and place the seed in a warm, bright spot. If nothing happens after 6 weeks, gently check for mold or rot—adjust your setup if needed.
Why isn’t my avocado seed sprouting?
Don’t worry—it’s often a fixable issue! Common culprits include:
- Too dry: Check moisture daily; the seed should feel damp but not waterlogged.
- Not enough warmth: Aim for 70–85°F (21–29°C). A sunny windowsill or grow light helps.
- Mold or rot: If you see fuzz or a foul smell, rinse the seed and let it dry slightly before replanting.
- Improper balance: Ensure the seed sits at a 45° angle with the flat side down—this encourages upward growth.
Can I plant the avocado seed directly in soil?
Yes! Once your seed sprouts 2–3 inches (5–7 cm) of roots and a small stem, it’s ready for soil. Transplant it into a pot with well-draining potting mix, keeping the roots covered but the top half exposed. Water lightly and place it in bright, indirect light to avoid shock.
How do I care for a sprouted avocado seed long-term?
Your seedling needs love and consistency to thrive:
- Light: Provide 6+ hours of bright, indirect light daily (a south-facing window or grow light works best).
- Water: Keep soil moist but not soggy—water when the top inch feels dry.
- Fertilizer: Wait until the seedling has 4–5 leaves, then use a balanced liquid fertilizer (diluted to half strength) monthly.
- Pruning: Pinch back leggy growth to encourage bushier growth.
What can I do with an avocado seed that won’t sprout?
Don’t toss it! Try these creative alternatives:
- Compost it: Break it down into nutrient-rich compost for your garden.
- Art or crafts: Sand it smooth for jewelry, bowls, or decorative pieces.
- Teach kids: Use it as a fun (failed) science experiment to discuss plant life cycles.
- Start over: Grab a new seed from your grocery store—some seeds just need extra time!
Wrapping up and next steps
Sprouting an avocado seed isn’t just a fun zero-waste project—it’s a rewarding way to grow your own plant while learning the magic of nature! 🌱 With the right tools, patience, and a little care, you’ll watch tiny roots and leaves emerge, turning kitchen scraps into a thriving houseplant.
Whether you’re aiming for a lush indoor garden or just curious about plant growth, this process is your gateway to greener living.
Ready to take the next step? Plant your sprouted seed in soil and nurture it into a full-grown avocado tree—who knows, you might just harvest fruit someday! 🌿 Happy growing!