
Lawn
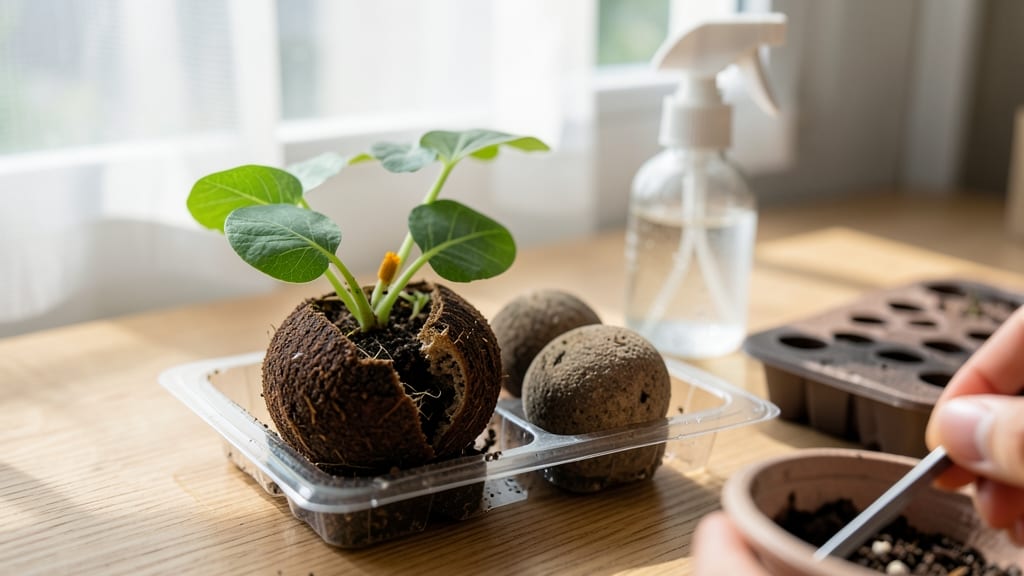
Seed starter pellets how to use turn germination from a guessing game into a foolproof process. 🌱 I used to struggle with damp paper towels and inconsistent moisture—until these little compressed discs changed everything.
They expand into perfect little pots, hold moisture just right, and give seedlings the strong start they need.
The magic is in the soaking: drop them in water for 10 minutes, and they triple in size, creating ideal conditions for germination. No more overwatering or underwatering—just consistent moisture that keeps seeds happy. You'll see sprouts in as little as 3-7 days, depending on the plant.
By the time you're ready to transplant, your seedlings will be sturdy enough to handle the move without shock. No more leggy, weak plants—just compact, healthy starts that thrive in their new home. The best part? You can reuse the pots if you compost the pellets afterward.
Perfect for herbs, vegetables, and flowers—even picky plants like tomatoes and peppers germinate reliably. Here's how to make the most of them without a single failed batch.
📚 In This Guide
- What you need
- Instructions
- Tips and common mistakes
- Wrapping up and next steps
What you need
- ● Seed starter pellets: 1–2 bags (quantity depends on your project size; a standard 16-pack covers ~16 plants). Look for peat-free or coir-based options for eco-friendly growing.
- ● Seed trays or containers: 1–2 trays (with drainage holes) or small pots (3–4 inches deep). Clear plastic trays work great for visibility.
- ● Seeds: Your chosen variety (check packet for spacing recommendations). Start with easy-to-grow seeds like basil, marigolds, or lettuce if you’re new!
- ● Water: Room-temperature or slightly warm (never cold). A spray bottle or watering can with a fine rose attachment is ideal.
- ○ Grow lights or sunny windowsill: A full-spectrum LED grow light (optional but recommended for indoor setups) or a south-facing window with 6+ hours of sunlight.
- ● Labels & markers: Small plant tags or popsicle sticks + a permanent marker to track seed types and planting dates.
- ● Humidity dome: A clear plastic lid or mini greenhouse to retain moisture while seeds germinate.
- ● Heating mat: For faster germination (especially for slow starters like peppers or tomatoes).
- ● Fertilizer: A balanced, water-soluble fertilizer (5-5-5 or 10-10-10) to nourish seedlings after sprouting.
- ● Tweezers or small spoon: For gently placing tiny seeds into pellets.
- ● Garden journal: To log progress, germination dates, and transplant timelines.
Step-by-step instructions for using seed starter pellets
Here's how I transform these little compressed disks into perfect germination starters—no mess, no fuss.
🌱 Step 1: Soak the Pellets Until Fully Expanded
Fill a clean tray or container with 2-3 inches of warm water and arrange the seed starter pellets in a single layer. They'll start expanding immediately, so keep them submerged until they've doubled in size—about 5-10 minutes. You'll know they're ready when they feel firm like a sponge and have expanded to about 1.5-2 inches in diameter.
Don't rush this step. Under-soaked pellets won't hold moisture properly, while over-soaked ones can become waterlogged and suffocate roots. I like to check them every 2 minutes after the initial 5-minute mark—just press gently with your finger. They should hold their shape but still feel slightly springy.
💧 Step 2: Transfer Pellets to a Growing Tray
Once expanded, carefully transfer each pellet to a seed tray or individual cell pack using a small spoon or your fingers. Space them about 1 inch apart to allow for airflow. Place the tray on a stable surface where it won't be disturbed—seedlings are delicate at this stage.
Here's the thing—don't press down on the pellets after transferring. Their structure is designed to hold moisture and nutrients without compression. If you notice any pellets collapsing or looking uneven, gently press the edges with your thumb to restore their shape.
☀️ Step 3: Plant Seeds and Maintain Moisture
Follow the seed packet instructions for depth—typically ¼ to ½ inch deep—and place 1-2 seeds per pellet. Lightly cover with a pinch of the pellet material if needed. Use a spray bottle to mist the surface until the pellets look uniformly damp but not soggy. This ensures the seeds stay hydrated without being displaced.
After planting, cover the tray with a clear plastic dome or plastic wrap to retain humidity. Place it in a warm spot with 65-75°F temperatures for optimal germination. Most seeds will sprout within 5-14 days, depending on the variety. Watch for the first tiny green shoots—this is your cue that germination is underway.
🌿 Step 4: Provide Light and Airflow
As soon as you see the first true leaves (not the initial cotyledons), remove the plastic dome immediately. This prevents damping-off disease, which thrives in high humidity. Move the tray to a location with bright, indirect light—a south-facing window or under grow lights positioned 2-4 inches above the seedlings.
You'll know your seedlings are getting enough light when they stand upright with dark green leaves. If they stretch toward the light or look pale, they need more intensity. Rotate the tray a quarter turn daily so they grow evenly. Strong seedlings will have thick stems and leaves spaced about 1 inch apart.
⏰ Step 5: Transplant When Ready
Seedlings are ready to transplant when they develop their second set of true leaves, usually within 3-4 weeks of planting. Gently squeeze the sides of the pellet to check for root development—you should feel resistance from roots filling the space. Water the seedlings lightly the day before transplanting to reduce stress.
To transplant, simply pop the pellet out of the tray and place it directly into the soil. The pellet will break down naturally, releasing nutrients as the roots grow. Space plants according to their mature size—typically 12-24 inches apart for most vegetables. Water deeply after transplanting to help the roots establish.
Tips & tricks for perfect seed starter pellet germination
These little tricks will help you turn compressed pellets into thriving seedlings every time—no guesswork involved!
Soak Like a Pro: The 5-10 minute soak time is your window for success. I've found that using a mesh strainer or colander makes this step effortless—just place the pellets inside, submerge completely, and drain excess water after 5 minutes. This prevents the messy water transfer and keeps your workspace clean. For even more control, use a kitchen scale to verify the water temperature stays between 70-75°F—too hot can shock the pellets, while too cold slows expansion.
Handling Delicate Pellets: When transferring those expanded pellets to your growing tray in Step 2, here's what I learned the hard way: use a damp paper towel as a makeshift mat. Lay it on your work surface, then gently place each pellet on it before sliding them into position. This prevents the fragile structure from collapsing under direct handling. And if any pellets look uneven after transfer, don't panic—just press the edges with your thumb to restore their shape. The key is gentle pressure, not force.
Lighting Secrets: That 2-4 inch distance for grow lights in Step 4 is crucial, but here's the real trick: use a ruler to measure and mark the exact position. As seedlings grow, I adjust the lights every 3-4 days to maintain that distance—this prevents leggy growth from stretching toward the light. For windowsill growers, rotate your tray quarter turn daily to ensure even exposure. You'll notice seedlings growing toward the light source if they're not rotated consistently.
Transplanting Timing: The 3-4 week transplant window is flexible, but here's how to know for sure: gently squeeze the pellet sides—if you feel resistance from roots filling the space, they're ready. I've also found that transplanting in the morning gives seedlings the full day to recover from transplant shock. The pellet's natural breakdown provides nutrients during this critical transition period, so don't rush this step even if your seedlings look perfect.
Pro Tips for Use Seed Starter Pellets
- These little tricks will help you turn compressed pellets into thriving seedlings every time—no guesswork involved!
- Soak Like a Pro: The 5-10 minute soak time is your window for success.
- Handling Delicate Pellets: When transferring those expanded pellets to your growing tray in Step 2, here's what I learned the hard way: use a damp paper towel as a makeshift mat.
Frequently asked questions
Got questions about seed starter pellets?
You’re not alone! Here are answers to the most common queries to help you grow like a pro.
What are seed starter pellets made of?
Seed starter pellets are typically made from sphagnum peat moss (or coconut coir in eco-friendly versions) compressed into small, convenient discs. They expand when soaked in water, creating a lightweight, nutrient-rich growing medium that mimics natural soil conditions. Perfect for seedlings!
How long do seed starter pellets take to expand?
Most pellets expand within 5–10 minutes when soaked in water. Place them in a shallow tray or bowl, cover with warm water, and let them soak until they’re fully swollen—about the size of a tennis ball. Pro tip: Drain excess water to avoid soggy roots!
Can I reuse seed starter pellets?
Unfortunately, no—pellets are designed for one-time use. After germination, they break down as roots grow, losing their structure. However, you can repurpose them by composting them or using the leftover soil mix in larger pots for transplants!
What if my seeds aren’t germinating in the pellets?
Check these troubleshooting steps:
- Moisture: Ensure pellets stay damp (not waterlogged). Mist lightly if dry.
- Temperature: Most seeds need warmth (70–85°F). Use a heat mat if needed.
- Depth: Plant seeds at the depth recommended on the packet—too deep can delay sprouting.
- Light: Some seeds need darkness to germinate (e.g., basil). Cover with a lid or towel if required.
Are seed starter pellets better than regular soil for seedlings?
Pellets offer sterile, consistent conditions that reduce damping-off disease (a fungal risk in regular soil). They’re also lightweight and easy to handle, but for long-term growth, transplant seedlings into well-draining potting mix once they’ve sprouted their first true leaves.
Wrapping up and next steps
Seed starter pellets are your secret weapon for growing lush, healthy plants with ease! 🌱 By following these simple steps—hydrating, planting, and nurturing—you’ll give your seeds the perfect head start, whether you’re reviving a lawn or growing flowers.
Now that you’re armed with the know-how, it’s time to roll up your sleeves and watch your green thumb shine.
Ready to take the next step? Try experimenting with different seeds or even upcycling pellets for multiple planting cycles. Happy growing—your future garden will thank you! 🌿