
Picking
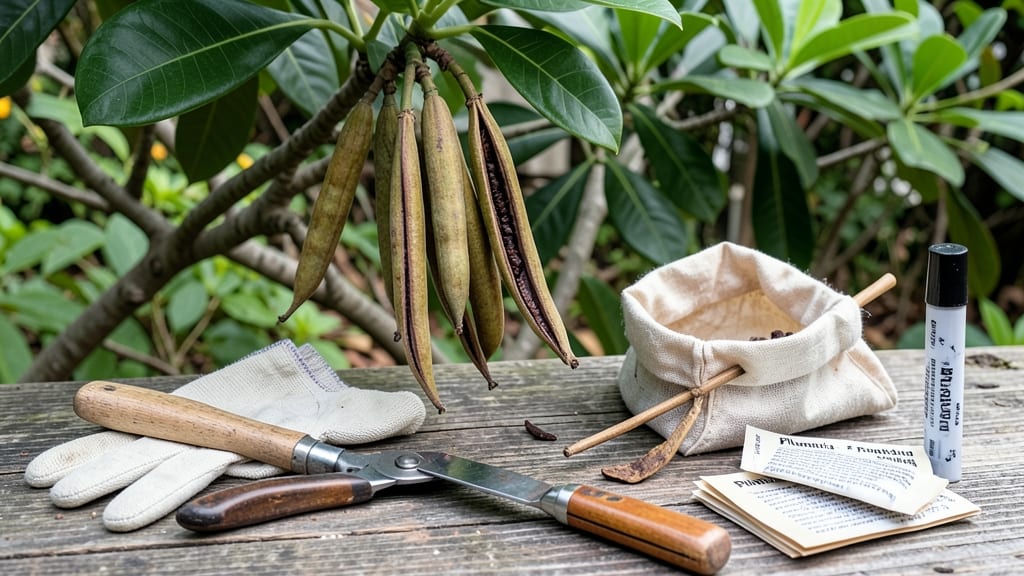
Harvesting plumeria seed pods at the right moment means the difference between viable seeds and brittle husks. 🌿 The pods must turn completely brown and dry before you touch them—any earlier, and the seeds inside won’t be ready for planting.
I’ve learned this the hard way after trying to rush the process and ending up with seeds that refused to germinate.
You’ll need just a few tools: sharp pruners for clean cuts, gloves to protect against the pods’ rough texture, and a paper bag to collect your harvest. The key is patience—waiting for the pods to fully mature ensures the seeds inside are plump and ready for germination.
Once they’re dry, a gentle twist usually releases them, but if they resist, a quick snip with pruners works without damaging the plant.
After harvesting, store the seeds in a cool, dry place until you’re ready to plant. Viable seeds should feel firm and heavy, not hollow or crumbly. When you’re ready to sow, soak them overnight to soften the tough outer shell—this trick boosts germination rates significantly.
With the right timing, you’ll see strong seedlings within a few weeks.
This method works for both tropical and subtropical climates, making it versatile for gardeners in zones 10-12. The twist-free technique preserves seed quality, so you can skip the guesswork and focus on nurturing your future plumeria trees. Ready to start? Here’s how to do it right the first time.
📚 In This Guide
- What you need
- Instructions
- Tips and common mistakes
- Wrapping up and next steps
What you need
- ● Mature Plumeria seed pods: Choose fully ripe pods (brown, dry, and slightly papery to the touch). Aim for at least 3–5 pods per harvest for better success rates.
- ● Sharp pruning shears or garden scissors: A pair with bypass blades (to avoid crushing seeds) and a 4–6 inch blade for precision cutting.
- ○ Disposable gloves (optional but recommended): Latex or nitrile gloves to protect your hands from resin and potential skin irritation.
- ● Paper towels or newspaper: A clean, dry surface (about 12x18 inches) for spreading pods to dry.
- ● Small bowls or paper plates: For sorting seeds—2–3 shallow containers work well.
- ● Fine-mesh strainer or sifter: A #20–30 mesh (0.5–0.6mm openings) to separate seeds from chaff.
- ● Plastic bags or airtight containers: Gallon-sized ziplock bags or small mason jars for seed storage.
- ● Pencil or marker: For labeling pods/containers with harvest date and variety (if applicable).
- ● Hand lens or magnifying glass: For inspecting seeds for viability (look for plump, intact seeds with no cracks).
- ● Hair dryer (cool setting): To speed up drying if you’re in a humid climate.
- ● Seed germination kit: Includes sterilized soil and a humidity dome for testing viability.
- ● Camera or phone: To document your pods—future you will thank you!
Step-by-Step instructions for harvesting plumeria seed pods
Here's my foolproof method for collecting viable plumeria seeds without damaging the pods or wasting time.
🌿 Step 1: Identify and Select Ripe Seed Pods
Plumeria seed pods mature over 6-8 weeks after flowering, turning from green to a dull brown when ready. Look for pods that feel firm but slightly dry to the touch—like a well-worn leather pouch. If they're still green, they need more time; if they're brittle or cracking open on their own, you've missed the window.
Gently twist the pod between your fingers to test its readiness. A ripe pod will pop open with a slight resistance (about ¼ turn), revealing the seed chamber inside. This is the moment you want to harvest—once pods split open naturally, seeds lose viability within 24 hours. I always check pods in the morning when they're cool and dry.
🌱 Step 2: Harvest Without Twisting the Stem
Use clean, sharp pruning shears to cut the pod ½ inch above the base where it meets the stem. Never twist or pull—the stem is delicate and will tear, exposing the plant to rot. Hold the pod gently with your other hand to stabilize it while cutting. This prevents the pod from splitting prematurely and ensures you get the whole seed chamber intact.
Place each harvested pod in a paper bag (not plastic—it traps moisture and speeds up spoilage). Label each bag with the harvest date and variety if you're working with multiple plumeria plants. I like to write directly on the bag with a marker so I don't forget which pods need priority attention.
💧 Step 3: Extract Seeds Immediately After Harvest
Within 2 hours of harvest, open each pod by carefully squeezing the sides until it splits along its natural seams. You'll see flat, papery seeds inside—each one should be light brown with a slightly waxy coating. Discard any seeds that are dark brown, moldy, or shriveled—these won't germinate.
Remove seeds from the pod and spread them on a clean, dry towel in a single layer. Let them air-dry for 12-24 hours in a shady, well-ventilated area (like a covered porch). This prevents fungal growth and prepares them for storage. I set up a small fan on low to circulate air gently—it speeds up drying without damaging the seeds.
☀️ Step 4: Store Seeds Properly for Germination
Once completely dry, transfer seeds to a paper envelope or breathable seed packet. Store them in a cool, dark place (like a sealed container in your refrigerator) where the temperature stays between 40-50°F. Properly stored plumeria seeds remain viable for up to 2 years, though I've found they germinate best within the first 6 months.
Before planting, soak seeds in lukewarm water for 12-24 hours to soften the waxy coating. This step is crucial—it mimics natural rainfall and helps break dormancy. After soaking, plant them in a well-draining seed-starting mix at a depth of ¼ inch, keeping the soil moist but not soggy until germination (which can take 4-12 weeks—patience is key!).
⏰ Step 5: Monitor for Germination and Early Growth
Check your planted seeds weekly for signs of germination. You'll see tiny green sprouts pushing through the soil surface first—this is your signal to reduce watering slightly. Overwatering at this stage causes damping-off, a fungal disease that collapses seedlings overnight. Once you see first true leaves (not the initial seed leaves), you can water normally.
Keep seedlings in bright, indirect light for the first 2 weeks, then gradually introduce morning sun to harden them off. Plumeria seedlings grow slowly at first, but don't rush them—transplanting too soon leads to root shock. I wait until seedlings have 3-4 sets of true leaves before moving them to individual pots.
Tips & tricks for perfect plumeria seed harvesting
Here's what nobody tells you about getting the most out of your plumeria seed pods—these tricks save time and keep your seeds viable.
Timing is Everything: The 24-hour window after pods split naturally is critical. If you miss this, seeds lose viability fast. I set a reminder on my phone for 2 hours after harvesting to extract seeds—this prevents spoilage and ensures you don't forget. Morning harvests are ideal because pods are cool and dry, making them easier to handle without splitting prematurely.
The Right Tools Make All the Difference: Pruning shears are non-negotiable for Step 2—they give you clean cuts ½ inch above the base without damaging the stem. I've tried scissors, and they just don't cut through the tough pod walls cleanly. Also, always sterilize your tools with rubbing alcohol before using them to prevent introducing pathogens to your plant.
Drying Secrets for Seed Longevity: When air-drying seeds for 12-24 hours, I place a small fan on low to circulate air gently. This speeds up drying without creating a humid environment that encourages mold. Spread seeds in a single layer on a clean towel—crowding them leads to uneven drying and potential spoilage. I also avoid direct sunlight, which can overheat the seeds and damage their delicate structure.
Storage Wisdom: The 40-50°F refrigerator storage range isn't just about temperature—it's also about humidity control. I use a small container with a few silica gel packets inside to absorb any excess moisture. This keeps seeds viable for up to 2 years, but I've noticed they germinate best when planted within 6 months of harvest. Label your storage containers with the harvest date so you can track freshness.
Pro Tips for Harvest Plumeria Seed Pods
- Here's what nobody tells you about getting the most out of your plumeria seed pods—these tricks save time and keep yo...
- Timing is Everything: The 24-hour window after pods split naturally is critical. If you miss this, seeds lose viabili...
- The Right Tools Make All the Difference: Pruning shears are non-negotiable for Step 2—they give you clean cuts ½ inch...
Frequently asked questions
Got questions about harvesting plumeria seed pods? You’re not alone—this delicate process can be tricky! Below, we’ve answered the most common questions to help you avoid frustration and maximize your success.
When is the best time to harvest plumeria seed pods?
The ideal time to harvest is when the pods turn light brown and begin to split open naturally—usually 4–6 weeks after flowering. Harvest them before they fully burst, as seeds lose viability quickly once exposed to air and pests. Early morning harvests (when pods are dry) reduce humidity-related issues.
How do I know if the seeds inside are still viable?
Viable plumeria seeds are plump, firm, and dark brown inside the pod. If they’re shriveled, moldy, or hollow-sounding when tapped, they’re likely non-viable. For extra peace of mind, soak seeds in water for 24 hours—good seeds will sink, while bad ones float. Pro tip: Store harvested pods in a paper bag (not plastic) in a cool, dry place for up to 2 weeks to preserve viability.
What do I do if the seed pods won’t open naturally?
If pods stay stubbornly closed, gently squeeze them with gloved hands or use a wooden spoon to tap them (avoid metal tools to prevent damage). For extra stubborn pods, place them in a paper bag with a ripe banana—ethylene gas from the banana can help soften the pod. Never force open pods with tools, as this can crush the seeds inside.
Can I harvest plumeria seeds from store-bought flowers?
Unfortunately, no. Most commercially sold plumeria flowers are spray-painted or treated to last longer, meaning they won’t develop seed pods. For viable seeds, you’ll need to harvest from live plumeria plants in your garden or a trusted nursery. If you’re buying seeds, ensure they’re labeled “open-pollinated” or “organic” for the best chances.
How long does it take for harvested seeds to germinate?
Plumeria seeds can take anywhere from 2–6 weeks to germinate, depending on temperature and moisture. Keep them in a warm, humid environment (70–80°F) with consistent moisture—not soggy. Use a seedling heat mat if your climate is cool. Patience is key! If no sprouts appear after 6 weeks, the seeds may have been non-viable or improperly stored.
What’s the best way to store plumeria seed pods for later use?
Store pods in a paper bag or breathable container with a silica gel packet to absorb moisture. Keep them in a cool, dark place (like a fridge) for up to 2–3 months. Avoid plastic bags, as they trap humidity and encourage mold. Label pods with the harvest date to track freshness!
Wrapping up and next steps
Harvesting plumeria seed pods is a rewarding process that unlocks the potential to grow your own fragrant, tropical beauties! By following the twist-free technique—patience, the right timing, and gentle handling—you’ll maximize seed viability and set the stage for thriving new plants. 🌱
Now that you’re equipped with the know-how, roll up your sleeves and give it a try! Start with just one seed pod to practice, and soon, you’ll be nurturing a whole grove of plumeria. Happy growing! 🌸