
Lawn
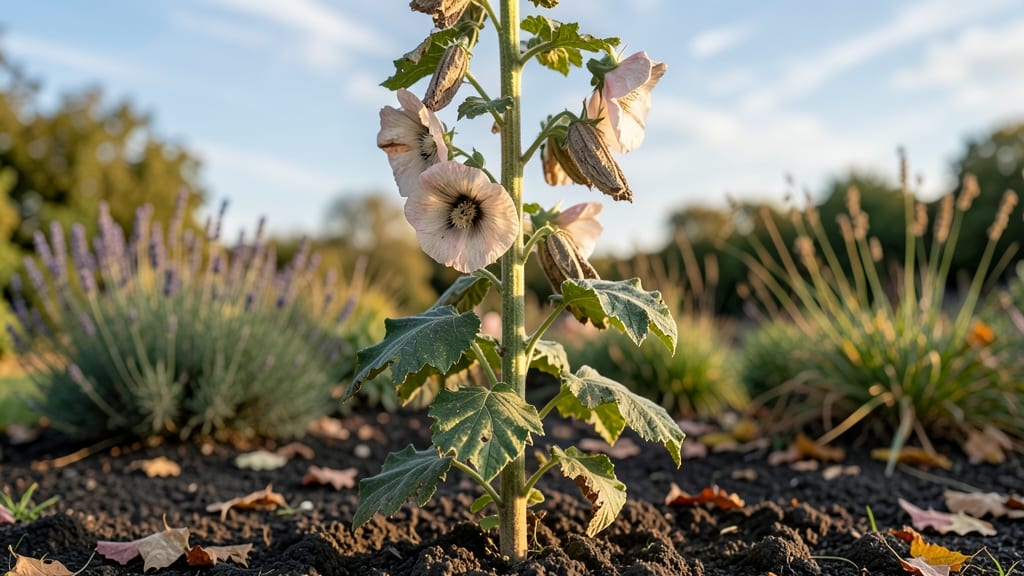
Harvesting hollyhock seed pods before they twist open is the secret to saving viable seeds year-round. 🌱 I’ve learned the hard way—when those pods dry and split too soon, the seeds scatter or lose viability.
The right timing and technique make all the difference, turning a finicky process into a foolproof way to grow your favorite varieties again next season.
You’ll need just a few simple tools: sharp scissors or pruners, a paper bag for collecting pods, and a dry, well-ventilated spot to store them. The key is harvesting pods when they’re dry but not yet cracked, usually in late summer or early fall, depending on your climate.
Once you’ve collected them, let them finish drying indoors before storing in a sealed container—this keeps moisture out and pests away.
With the right approach, you’ll end up with plump, dark seeds ready for next year’s planting. The payoff? A garden full of the same stunning blooms you love, without the hassle of buying new plants.
Plus, you’ll save money and avoid the disappointment of store-bought varieties that don’t perform as well.
If you’re new to seed saving, don’t worry—this method is beginner-friendly. Just watch for signs of mold or pests in your stored pods, and you’ll be well on your way to a reliable, homegrown supply. Ready to give it a try?
📚 In This Guide
- What you need
- Instructions
- Tips and common mistakes
- Wrapping up and next steps
What you need
- ● Hollyhock plants: Mature plants (at least 1–2 years old) with fully developed seed pods (brown, dry, and slightly papery). Aim for Alcea rosea varieties for best results.
- ● Pruning shears or sharp scissors: Clean, sterilized tools to snip pods without damaging stems (avoid dull blades!).
- ● Brown paper bags or seed envelopes: 3–5 medium-sized bags (1–2 pods per bag) to prevent moisture buildup. Label each with the hollyhock variety and harvest date!
- ● Newspaper or cardboard: A flat surface (12"x18" or larger) for drying pods indoors.
- ● Rubbing alcohol (70% isopropyl) and cotton swabs: For sterilizing tools between cuts (prevents mold!).
- ● Pencil or marker: Waterproof, for labeling.
- ○ Small fan or dehumidifier (optional but helpful): Speeds up drying in humid climates.
- ● Dry, sunny weather: Harvest pods on a clear, warm day (70–85°F) to avoid dampness. Early morning is ideal!
- ● Indoor drying space: A well-ventilated area with (basements or garages may need a fan).
- ○ Seed storage container: Airtight jar or envelope with a silica gel packet (optional) to maintain dryness.
- ● 🔍 Pick pods at the right stage: They should be brown and crispy—not green or soft. Overripe pods may crack open prematurely!
- ● ✂️ Snip, don’t yank: Cut pods 1–2 inches above the stem to avoid damaging the plant.
- ● 🌬️ Stir pods weekly: While drying, gently shake bags or flip pods to ensure even airflow.
Step-by-Step guide to harvesting hollyhock seed pods safely
Hollyhocks are stubborn about seed saving—here's how to crack their tough pods without damage.
🌱 Step 1: Identify and Select Mature Seed Pods
Wait until pods turn from green to tan or brown and begin splitting open naturally—this usually happens in late summer to early fall. Look for pods that feel dry and papery to the touch, not firm or green. I always check the oldest flowers first since they mature earliest.
Gently squeeze the pod between your fingers. If it crumbles slightly but doesn't split open completely, it's ready. If it's still hard, leave it on the plant another week. Overripe pods will burst open and scatter seeds everywhere, so timing matters. Harvest on a dry, sunny morning when humidity is low to prevent mold.
🌿 Step 2: Harvest Without Twisting or Breaking Stems
Hollyhock stems are brittle—don't yank pods off or you'll snap the stem and lose the whole flower head. Instead, use a sharp, clean pruning shears to cut the stem 1-2 inches below the pod. Hold the stem firmly with one hand while cutting to avoid crushing it.
Place harvested pods in a paper bag (not plastic—it traps moisture) and label them with the variety name and harvest date. I like to hang the bags upside down in a dry, shaded spot to allow any lingering moisture to evaporate naturally over 24-48 hours. This prevents mold from forming inside the pods.
✂️ Step 3: Open Pods and Extract Seeds Gently
Once pods are completely dry, lay them on a clean white sheet of paper or tray. Use a small butter knife or popsicle stick to carefully pry open the pod along its seams. Hollyhock seeds are large and flat, so you'll see them inside once the pod splits.
Tap the pod lightly with your finger to release any remaining seeds. Avoid shaking too hard—seeds are delicate and can crack. Spread the seeds out on the paper to dry for another 24 hours in a warm, dry place. This final drying step ensures seeds stay viable for planting next season.
🪴 Step 4: Store Seeds Properly for Long-Term Viability
Transfer dried seeds into a small envelope or airtight container with a silica gel packet to absorb excess moisture. Label the container with the variety name and harvest year. Hollyhock seeds can stay viable for 2-3 years if stored in a cool, dark place like a seed vault or refrigerator.
Check stored seeds every 6 months for signs of mold or pests. If you notice any discoloration or musty smells, discard those seeds immediately. Freshly harvested seeds have the highest germination rate, so use the oldest seeds first when planting.
⏰ Step 5: Test Germination Before Planting Next Season
Before committing to planting, test a few seeds by placing them between two damp paper towels in a sealed plastic bag. Keep them in a warm spot (around 70°F) and check daily for sprouts. Hollyhock seeds typically germinate in 7-14 days—if they don't sprout within that time, they may have lost viability.
This simple test saves you from planting dozens of seeds that might not grow. Once you confirm viability, you're ready to sow your hollyhocks in early spring for a stunning display the following year.
Tips & tricks for perfect hollyhock seed pod harvesting
These simple tricks will help you avoid common pitfalls and ensure you collect healthy, viable seeds every season.
Timing Secret: The 24-48 hour drying period in Step 2 is crucial for preventing mold—don't rush it! Place your paper bags in a well-ventilated area where airflow circulates naturally. I've found that hanging them near an open window (but not in direct sunlight) gives the best results while keeping humidity low.
Tool Technique: For Step 3, a popsicle stick works wonderfully for prying open pods, but if you're dealing with extra-tough pods, try a small butter knife—just be gentle to avoid damaging the seeds inside. I've also used the back of a spoon in a pinch, though it requires more patience.
Storage Wisdom: When storing seeds in Step 4, consider adding a few grains of rice to your airtight container alongside the silica gel packet. The rice absorbs moisture without drying out the seeds, providing an extra layer of protection during those long storage months.
Pro Tips for Hollyhocks Seed Pods
- These simple tricks will help you avoid common pitfalls and ensure you collect healthy, viable seeds every season.
- Timing Secret: The 24-48 hour drying period in Step 2 is crucial for preventing mold—don't rush it! Place your paper ...
- Tool Technique: For Step 3, a popsicle stick works wonderfully for prying open pods, but if you're dealing with extra...
Frequently asked questions
Got questions about harvesting and saving hollyhock seed pods?
You’re not alone! Here are some of the most common queries—and their practical answers—to help you master the process like a pro.
When is the best time to harvest hollyhock seed pods?
Harvest seed pods when they’re dry and brown but before they split open—usually late summer to early fall. If you wait too long, seeds scatter, and viability drops. Aim for crisp, papery pods that rattle when shaken. Pro tip: Morning harvests work best since dew keeps pods firm.
Why do my hollyhock seed pods twist and refuse to open?
Hollyhocks are notorious for their twisty, stubborn pods—a natural defense to protect seeds! Use a twist-resistant technique: Gently squeeze the pod’s base while turning a knife blade along the seam (not across). Avoid force; patience prevents seed damage. If pods are too tough, let them dry indoors for 1–2 days first.
How long can I store hollyhock seeds before planting?
Store seeds in a cool, dry place (like a sealed envelope or jar) for up to 2 years. For best results, plant them within 6–12 months—germination rates decline over time. Label your seeds with the harvest date to track freshness! Fun fact: Hollyhock seeds are non-toxic and even edible (though not tasty).
What if my hollyhocks don’t produce seed pods?
Missing pods? Check for these issues:
- No pollinators: Hollyhocks rely on bees/butterflies. Plant nearby pollinator-friendly flowers (like lavender or marigolds).
- Deadheading: If you removed all spent blooms, the plant won’t set seeds. Leave 1–2 flowers per stem to develop pods.
- Poor growing conditions: Hollyhocks need full sun and well-draining soil. Amend heavy clay or soggy soil with compost.
Can I grow hollyhocks from seed pods in any climate?
Hollyhocks thrive in USDA Zones 3–9 but prefer cool summers. In hot climates (Zone 10+), grow them as annuals or provide afternoon shade. Start seeds indoors 6–8 weeks before last frost for better survival. Cold-hardy tip: Mulch plants in winter to protect roots in colder zones.
Wrapping up and next steps
From twist-resistant harvesting to year-round seed saving, mastering the art of collecting hollyhock seed pods is simpler—and more rewarding—than you think! 🌱 These resilient blooms offer a low-maintenance way to propagate your garden, ensuring fresh growth season after season.
Now that you’re equipped with the right tools, timing, and techniques, why not take the next step?
Start small: harvest a few pods this fall, test your drying method, and watch your garden flourish with homegrown hollyhocks next year. Happy gardening—your future blooms are waiting! 🌸