
Propagation
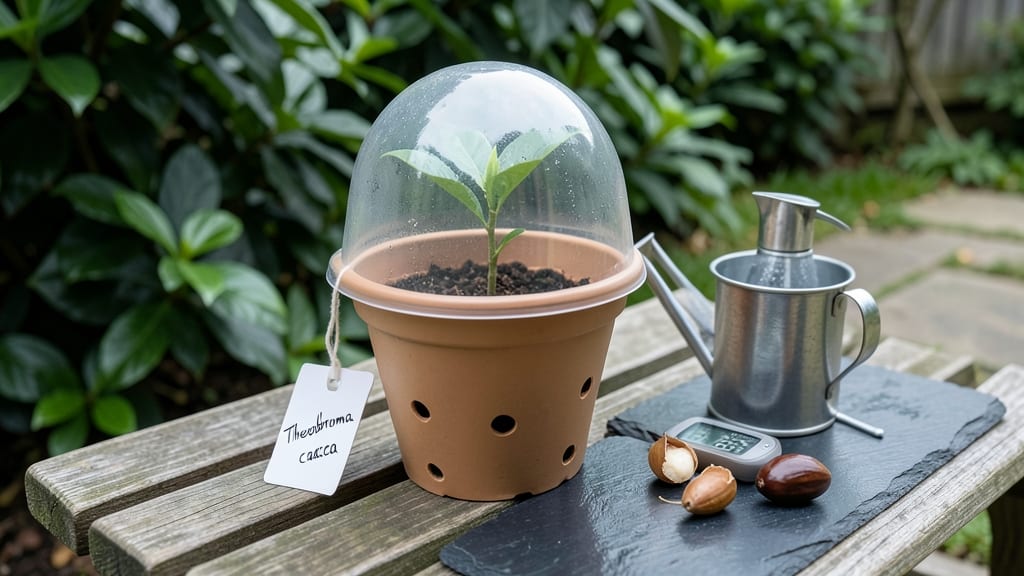
Cocoa seed germination takes patience, but the first green shoot is worth every day of waiting. 🌱 I’ve learned that the key isn’t rushing—it’s creating the right conditions for those tiny seeds to wake up slowly and steadily. What starts as a hard, dark bean can become a lush young tree with just the right balance of warmth, moisture, and time.
The process begins with selecting fresh, plump seeds and choosing between soil or water germination—both work, but soil mimics natural conditions better. You’ll need a warm spot (around 75-85°F), high humidity, and indirect light to keep seedlings from stretching too fast.
Most seeds sprout in 2-4 weeks, but some take longer—don’t give up if yours lag behind.
Once those first leaves appear, you’ll be hooked on the thrill of nurturing a future tree. The seedlings are delicate but resilient, and with consistent care, they’ll grow into sturdy plants ready for transplanting. By next year, you could be watching your own cocoa trees reach for the sky.
This method works for small-scale gardeners and curious beginners alike—no greenhouse required. The real magic happens when you see those first true leaves, proof that your patience paid off. Let’s get those seeds sprouting!
📚 In This Guide
- What you need
- Instructions
- Tips and common mistakes
- Wrapping up and next steps
What you need
- ● Fresh cocoa beans (seeds): 10–20 mature, fermented, and dried cocoa seeds (ensure they’re from high-quality, organic sources if possible).
- ● Germination medium: Option 1: 1–2 small pots (4–6 inches in diameter) filled with sterilized coconut coir or peat moss (moisture-retentive and well-draining).
- ● Option 2: A seed-starting tray with biodegradable pots (2–3 inches deep) and a humidity dome.
- ● Water: Room-temperature, chlorine-free water (rainwater or filtered works best).
- ● Spray bottle: 8–16 oz with a fine mist nozzle (for gentle hydration).
- ● Plastic wrap or humidity dome: Clear plastic wrap or a store-bought dome to maintain moisture.
- ○ Heating mat (optional but helpful): A seedling heat mat (set to 75–85°F) to speed up germination.
- ● Small knife or scissors: For carefully cracking open cocoa pods (if starting from whole beans).
- ● Tweezers or gloves: To handle seeds without damaging them.
- ○ pH testing kit (optional): To check soil pH (ideal range: 5.5–6.5).
- ● Fertilizer (post-germination): A balanced, water-soluble fertilizer (e.g., 10-10-10) diluted to half-strength.
- ● Grow lights or sunny windowsill: A LED grow light (12–16 hours/day) or a south-facing window for seedlings.
Step-by-step instructions for germinating cocoa seeds indoors
Here's how I've successfully sprouted cocoa seeds year after year—no fancy equipment needed.
🌱 Step 1: Extract and Prepare the Seeds
Gently open a fresh cocoa pod (wear gloves—it's messy!) and remove the white seeds covered in sweet pulp. Rinse the seeds thoroughly under running water to remove all pulp residue. This step is crucial because leftover pulp can rot the seeds before they even sprout.
Place the cleaned seeds in a bowl of lukewarm water for 24 hours. This softens the hard outer shell and kickstarts the germination process. You'll see the seeds plump up noticeably—they should feel firm but not mushy when pressed gently. Drain and pat them dry with a paper towel before moving to the next step.
💧 Step 2: Set Up the Germination Container
Fill a small container (like a 6-inch plastic pot or even a repurposed yogurt cup) with a mix of 50% peat moss and 50% perlite. This lightweight blend drains well while retaining enough moisture for the seeds to sprout. Moisten the mix until it's damp but not soggy—think of a wrung-out sponge.
Make two small holes in the soil, about ½ inch deep and 2 inches apart. Plant one seed per hole, pressing lightly so the soil covers it completely. Place the container in a warm spot (around 75-85°F) like on top of your refrigerator or near a sunny window. Cover the container loosely with clear plastic wrap to retain humidity.
☀️ Step 3: Monitor for Sprouts and Adjust Conditions
Check the container daily for moisture—keep the soil consistently damp but never waterlogged. You'll see the first signs of germination in 7-14 days, when a tiny white root emerges from the seed. Once you spot this, remove the plastic wrap immediately to prevent mold growth.
When the first true leaves appear (they'll look like small, rounded cocoa leaves), move the seedlings to a location with bright, indirect light. Direct sunlight can scorch the delicate seedlings. Rotate the container weekly so the seedlings grow straight rather than leaning toward the light.
⏰ Step 4: Transplant and Care for Young Seedlings
After 4-6 weeks, when the seedlings have 2-3 sets of true leaves and are about 3-4 inches tall, it's time to transplant. Choose individual 4-inch pots filled with a mix of 60% potting soil, 20% perlite, and 20% compost. Gently remove the seedling, keeping the root intact, and plant it at the same depth it was growing before.
Water lightly after transplanting and place the pots in a warm, humid environment. Cocoa seedlings thrive in 70-80°F temperatures and high humidity (60-70%). You'll know you're doing well when the leaves stay vibrant and the seedlings grow steadily—about ½ inch per week. Avoid overwatering; let the top inch of soil dry out between waterings.
Tips & tricks for perfect cocoa seed germination
Real talk: Germinating cocoa seeds is more about patience and precision than fancy techniques. Here's what I've learned after years of trial and error to make your sprouting journey smoother.
Seed Selection Matters: Choose pods that feel heavy for their size—this usually means they're fully mature and contain viable seeds. The seeds should be plump and firm, not shriveled or soft. If you're working with store-bought chocolate, don't bother—the seeds won't germinate. You need fresh, untreated cocoa pods for success.
The 24-Hour Soak Secret: That lukewarm water soak isn't just about hydration—it's about breaking the seed's natural dormancy. I've found using distilled water instead of tap water reduces the risk of contaminants that could inhibit germination. After soaking, gently press the seeds between your fingers—they should feel firm but slightly yielding, like a ripe avocado. If they're mushy, they've absorbed too much water and may rot.
Container Creativity: You don't need a fancy 6-inch pot—any clean container with drainage will work. I've successfully used everything from repurposed yogurt cups with drainage holes poked in the bottom to old plastic takeout containers. Just make sure whatever you choose can maintain consistent warmth and humidity. For extra warmth, place your container on top of your refrigerator or near a sunny window (but not in direct sunlight during germination).
Transplant Timing: The 4-6 week mark for transplanting is flexible based on your climate. In cooler homes, you might need to extend this to 7-8 weeks. Watch for those 2-3 sets of true leaves and 3-4 inch height before transplanting—these are your clear indicators, not the clock. When repotting, use a clean spoon to gently loosen the root ball before placing it in the new pot to minimize root damage.
Pro Tips for Cocoa Seed Germination
- Real talk: Germinating cocoa seeds is more about patience and precision than fancy techniques. Here's what I've learn...
- Seed Selection Matters: Choose pods that feel heavy for their size—this usually means they're fully mature and contai...
- The 24-Hour Soak Secret: That lukewarm water soak isn't just about hydration—it's about breaking the seed's natural d...
Frequently asked questions
Got questions about sprouting cocoa seeds? You’re not alone! Here are answers to the most common queries—so you can grow your own cocoa trees with confidence.
How long does it take for cocoa seeds to germinate?
Germination typically takes 2–4 weeks under ideal conditions (warmth, moisture, and indirect light). Some seeds may sprout faster, while others take longer—patience is key! If no sprouts appear after 6 weeks, the seed may be non-viable. Pro tip: Keep the soil consistently damp (not soggy) to speed up the process.
What’s the best temperature for cocoa seed germination?
Cocoa seeds thrive in 75–85°F (24–29°C). Use a seedling heat mat or place the pot near a sunny window (but avoid direct sun). If your home is cooler, a warm spot like a kitchen counter or greenhouse works best. Cold drafts or temps below 60°F (15°C) can stall germination.
Why won’t my cocoa seeds sprout?
Common culprits include:
- Dry soil: Keep the medium moist but not waterlogged.
- Low humidity: Cover the pot with plastic wrap or use a humidity dome.
- Old seeds: Fresh seeds (from fermented pods) germinate better.
- Poor drainage: Overwatering can rot seeds—use a well-draining mix.
Can I grow cocoa seeds indoors year-round?
Yes! Cocoa trees adapt well to indoor growing, especially in USDA Zones 10–12. Start seeds in pots (6+ inches deep) and move them outdoors only when they’re 1–2 feet tall and temperatures stay above 60°F (15°C). Use grow lights if natural light is limited. Note: They’ll need a dormancy period (cooler temps) to flower/fruit later.
What’s the fastest way to get a cocoa tree from seed?
Speed up germination with these steps:
- Soak seeds in warm water for 24–48 hours to soften the shell.
- Plant 1/2-inch deep in a mix of peat moss and perlite.
- Cover with plastic wrap to retain moisture and warmth.
- Place in bright, indirect light (no direct sun yet!).
- Transplant seedlings to larger pots once they have 2–3 true leaves.
Wrapping up and next steps
Mastering cocoa seed germination is your gateway to nurturing thriving cocoa trees—whether for a lush home garden or a future harvest! 🌱 With the right materials, patience, and care, you’ve got everything you need to kickstart this rewarding journey.
The key? Stay consistent, monitor moisture, and let nature do the rest.
Ready to take the next step? Start small—plant a few seeds this season and observe their progress. Once you’ve perfected the process, expand your cocoa grove or share your expertise with fellow plant enthusiasts. Happy growing! 🌿