
Lawn
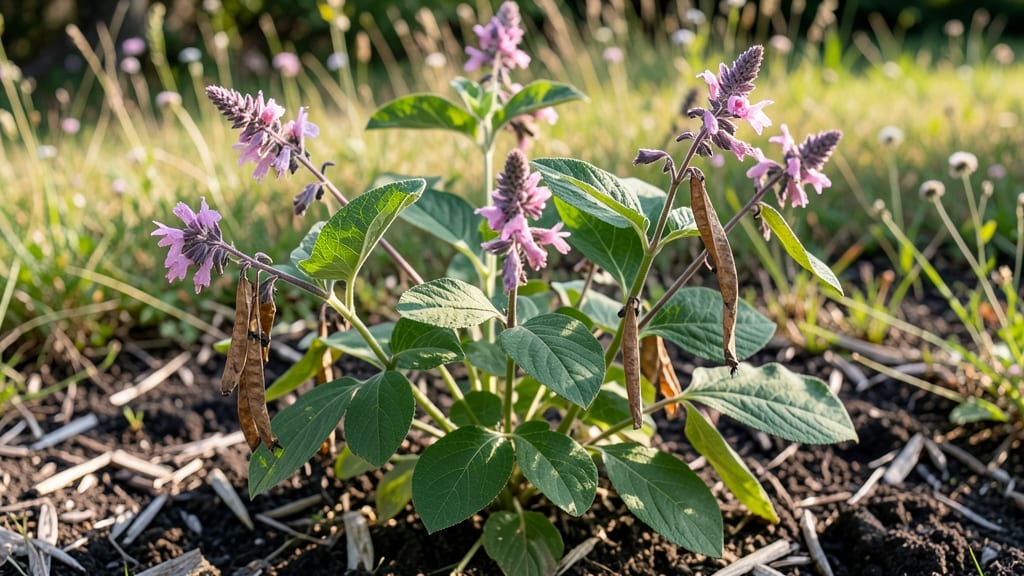
Growing indigo from seed pods starts with cold-stratifying them for 60 days—a process that transforms stubborn seeds into reliable starters. 🌱 I’ve struggled with this before, but once you master the timing and moisture balance, those tiny pods unlock a plant packed with history and vibrant blue potential.
The key isn’t just patience; it’s recreating the natural winter chill that breaks dormancy.
You’ll need a mix of well-draining soil, a cool (35–45°F) spot, and a humidity dome to keep seeds moist without rotting. Indigo thrives in full sun but tolerates partial shade—perfect for gardens where space is limited.
Water lightly every 2–3 days, ensuring the soil stays damp but never soggy. Most varieties, like Indigofera tinctoria, germinate within 2–4 weeks after stratification, though some stubborn pods take longer.
Once sprouted, your indigo plants will reward you with lush, nitrogen-fixing foliage and—eventually—those prized seed pods. Harvest them when they turn dark brown and papery, then dry them in a well-ventilated area for dye-making or replanting.
The best part? These plants improve soil health while giving you a sustainable source of natural indigo for textiles or crafts.
Works in USDA Zones 8–11, but with cold stratification, you can grow them almost anywhere. If you’re in cooler climates, start seeds indoors 8–10 weeks before your last frost.
The payoff? A low-maintenance, high-reward plant that connects you to centuries of dye traditions—and a garden that hums with quiet productivity.
📚 In This Guide
- What you need
- Instructions
- Tips and common mistakes
- Wrapping up and next steps
What you need
- ● Indigo seed pods: 10–20 pods (organic, non-GMO preferred for best results).
- ● Cold-stratification setup: 1–2 plastic storage bags (quart-sized or larger) with zip-top seals.
- ● 1 cup damp peat moss or coco coir (moist but not soggy).
- ○ Optional: Vermiculite (½ cup) for moisture retention.
- ● Planting containers: 4–6 small pots (4–6 inches deep) with drainage holes.
- ● OR a seed tray with individual cells (if starting indoors).
- ● Potting mix: 2–3 gallons of well-draining, seed-starting mix (avoid garden soil).
- ● Basic tools: Small trowel or spoon for transplanting.
- ● Spray bottle for gentle watering.
- ● Ruler or measuring tape (for depth tracking).
- ● Refrigerator or cold frame: Consistent 35–45°F (2–7°C) for stratification (60 days).
- ● Grow lights or sunny windowsill: 6–8 hours of light/day post-stratification (if indoors).
- ● Outdoor space: Full sun (6+ hours/day) for transplanting seedlings (zones 7–10).
- ● Humidity dome or plastic wrap to retain moisture during early growth.
- ● pH test kit (ideal soil pH: 6.0–7.0 for indigo).
- ● Slow-release fertilizer (5-10-5 ratio) for post-transplant boost.
- ● Label markers to track seed pod varieties.
How to cold-stratify indigo seed pods for reliable germination
This method breaks dormancy naturally—no fancy equipment, just patience and a fridge.
🌱 Step 1: Harvest and Prepare the Seed Pods
Collect mature indigo pods when they turn brown and begin splitting open. The seeds inside should be firm and dark—never use shriveled or moldy pods. I like to harvest in late summer when the pods are fully dry but haven’t yet released seeds naturally. Remove the seeds by gently squeezing the pods over a clean tray, then spread them on a paper towel to air-dry for 24 hours.
Here’s the thing—indigo seeds have a tough outer coating that needs softening before stratification. Soak the seeds in lukewarm water for 12 hours to loosen the seed coat. You’ll see them swell slightly, which signals they’re ready for the next step. Drain well and let them dry again on the paper towel for another 24 hours before moving to cold treatment.
❄️ Step 2: Cold-Stratify for 60 Days
Fill a zip-top plastic bag with 2 inches of dampened peat moss or coconut coir—just enough moisture to feel damp but not dripping. Add the dried seeds and seal the bag, leaving a small gap for airflow. Place the bag in a refrigerator (not freezer) set to 35-40°F, where it’ll stay consistently cold for the next 60 days.
Check the bag weekly—you’ll notice condensation on the inside, which is normal. If the mix feels soggy, unzip it and let it air out for 10 minutes before resealing. The goal is steady moisture, not wetness. After 4 weeks, you might spot tiny cracks in some seeds—that’s the seed coat breaking down, and it’s a good sign.
☀️ Step 3: Test for Germination Readiness
After 60 days, remove the bag from the fridge and let it sit at room temperature for 24 hours to acclimate. Plant the seeds ½ inch deep in a well-draining mix of 50% potting soil and 50% perlite. Moisten the soil lightly—just enough to dampen it without soaking. Place the container in a warm spot with indirect light (like a sunny windowsill with sheer curtains) and maintain a soil temperature of 70-75°F.
Germination can take 10-21 days, so don’t rush it. You’ll see the first true leaves emerge as two small, rounded cotyledons—this is your cue that the seeds have broken dormancy successfully. If nothing sprouts after 3 weeks, gently dig up a seed to check for rot. Over-moisture during stratification is the usual culprit.
🌿 Step 4: Transplant and Care for Seedlings
Once seedlings have 2-3 sets of true leaves (not just the initial cotyledons), they’re ready for individual pots. Use 4-inch containers filled with a mix of 60% potting soil and 40% compost. Transplant carefully, keeping the soil level even with the seedling’s base—burying the stem too deep invites rot. Water gently at the base to avoid disturbing the roots.
Place the pots in bright, indirect light for the first week to help them adjust. After that, gradually introduce 4-6 hours of morning sun daily, increasing exposure by 1 hour per day until they’re hardened off. You’ll know they’re thriving when new leaves appear vibrant green and the stems thicken noticeably.
Tips & tricks for perfect indigo seed germination
These little-known details make all the difference when breaking indigo seed dormancy.
Harvest Timing: The key to successful germination starts with harvesting pods at the exact right moment—when they're fully brown but haven't yet split open naturally. This ensures maximum seed viability. I've found that late summer harvesting (around August) in most climates gives the best results. The seeds should feel firm and dark inside, never shriveled or moldy. If you're harvesting from wild plants, avoid pods that have already released seeds—they're past their prime.
Soaking Technique: That 12-hour lukewarm water soak isn't just about hydration—it's about breaking down the tough seed coat that prevents germination. Here's what nobody tells you: the water should be warm enough to feel comfortable to your wrist (around 90°F), not scalding. After soaking, drain the seeds completely and pat them dry with a paper towel before the second 24-hour drying period. Any residual moisture can lead to mold during stratification.
Stratification Environment: Your refrigerator's temperature matters more than you might think. While the instructions specify 35-40°F, I've found that the back of most refrigerators (where it's coldest) often drops below 35°F. If your fridge runs cold, consider using a slightly warmer area like the crisper drawer. The goal is consistent cold—fluctuations can confuse the seeds. Also, that small gap for airflow in the sealed bag is crucial; it prevents condensation buildup that could lead to mold.
Germination Testing: When checking for germination readiness after 60 days, look for two key visual cues: the seed coat should show tiny cracks (like a hairline fracture), and the seeds may appear slightly swollen compared to their original size. If you're impatient and want to test viability without planting, place a few seeds between damp paper towels in a sealed container at 70°F for 5-7 days. If they sprout, you're good to go!
Pro Tips for Indigo Seed Pods
- These little-known details make all the difference when breaking indigo seed dormancy.
- Harvest Timing: The key to successful germination starts with harvesting pods at the exact right moment—when they're ...
- Soaking Technique: That 12-hour lukewarm water soak isn't just about hydration—it's about breaking down the tough see...
Frequently asked questions
Got questions about growing indigo seed pods? You’re not alone! Here are some of the most common queries—and their straightforward answers—to help you succeed with cold-stratified germination.
How do I know if my indigo seed pods are truly ready for planting?
Look for firm, dry pods that turn from green to brown when fully mature. If they’re still green or squishy, they need more time on the plant. Once harvested, store them in a cool, dry place until you’re ready to stratify them. Pro tip: Tap a pod—if it makes a hollow sound, it’s ready!
Why aren’t my indigo seeds germinating after cold stratification?
Cold stratification mimics winter, but timing matters! If seeds still won’t sprout after 60 days, check for moisture consistency (they should stay damp, not soggy) and temperature (34–40°F is ideal). Try light stratification (exposing seeds to indirect light for 1–2 hours daily) or test a few seeds in a warm, humid environment to rule out viability issues.
Can I use indigo seed pods for anything other than dye or planting?
Beyond germination, the pods and leaves have traditional uses like natural fabric dyes, medicinal teas (for inflammation), or even as a nitrogen-fixing green manure in gardens. Just avoid consuming them raw—they contain indican, which can cause mild stomach upset unless properly prepared.
What’s the best way to store leftover indigo seed pods for next year?
Store pods in a paper bag or breathable container with a silica gel packet to absorb moisture. Keep them in a cool, dark place (like a fridge) for up to 2 years. Avoid airtight containers—humidity is the enemy of seed longevity!
Are there faster alternatives to cold-stratifying indigo seeds?
While cold stratification is the most reliable method, you can try heat stratification (soaking seeds in warm water for 24 hours) followed by a warm germination mat (70–75°F). However, success rates drop significantly—expect 30–50% germination compared to 80%+ with cold stratification. Patience pays off!
Wrapping up and next steps
Indigo seed pods offer a rewarding journey for gardeners—whether you're drawn to their vibrant blooms or their low-maintenance charm. With just a little patience and the right cold-stratification technique, you can watch them thrive in as little as 60 days.
Now that you’re armed with the knowledge, why not roll up your sleeves and give it a try? Start by gathering your supplies, and soon, you’ll be enjoying a lush, indigo-filled garden that’s the envy of the neighborhood! 🌱✨