
Propagation
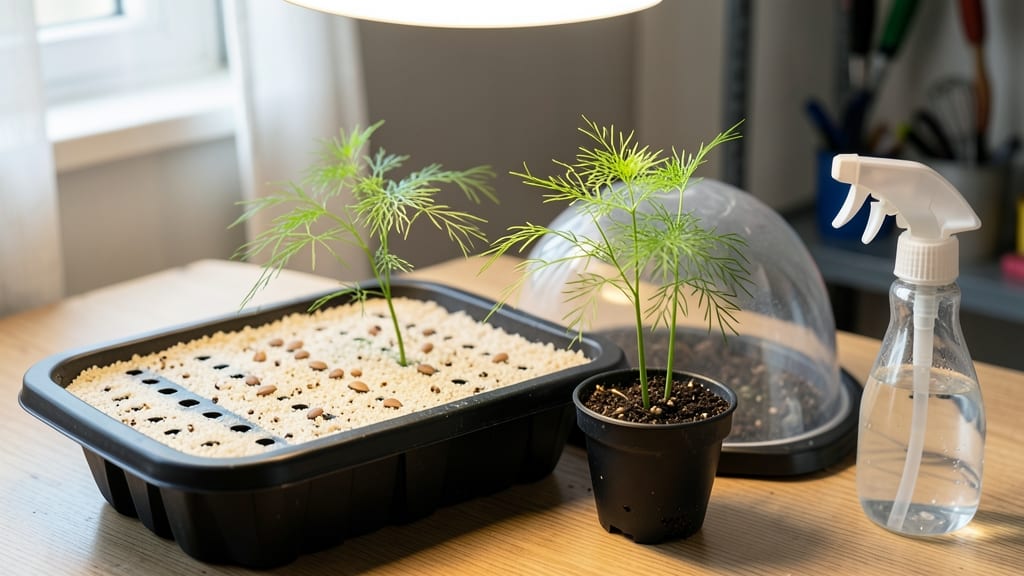
Growing asparagus from seed indoors is the ultimate patience test—because these slowpokes take two to three years just to produce their first spears. 🌱 I’ve tried it twice, and while it’s not as rewarding as outdoor beds, there’s something satisfying about watching those ferny fronds unfurl in a pot by my window.
The key? Starting early, keeping them alive through winter, and accepting that indoor conditions will never match a garden bed’s productivity.
You’ll need a sunny window (south-facing is ideal), a grow light for backup, and a deep container—at least 6 inches tall—since asparagus roots run deep. The soil mix should be loose and well-draining (think 50% potting soil, 50% perlite or sand), and temperatures should stay between 65-75°F.
Seeds germinate in 4-6 weeks, so start them in late winter if you want spears by summer. No shortcuts here—this isn’t a fast crop.
By year three, you might harvest a handful of spears—nothing like a full outdoor bed, but enough to prove it’s possible. The real payoff? Learning patience and troubleshooting (like leggy seedlings from weak light or moldy soil from overwatering).
It’s not for everyone, but if you love a challenge, these tough plants will reward your persistence with emerging spears in early spring—right when store-bought ones are still weeks away.
Fair warning: This isn’t a get-rich-quick project. But if you’re already growing other veggies indoors, why not give asparagus a shot? Just don’t expect miracles—think of it as a long-term experiment rather than a reliable harvest. Here’s how to set it up without killing your seeds before they even sprout.
📚 In This Guide
- What you need
- Instructions
- Tips and common mistakes
- Wrapping up and next steps
What you need
- ● Asparagus seeds: 10–20 seeds (choose heirloom or hybrid varieties like Mary Washington or Purple Passion for best results).
- ● Seed-starting trays or small pots: 4–6" deep (asparagus roots need room to stretch!). Use biodegradable pots if transplanting later.
- ● Well-draining potting mix: A seed-starting mix (sterile, lightweight) or a blend of 50% peat moss, 30% perlite, and 20% vermiculite.
- ● Grow lights or a sunny windowsill: A full-spectrum LED grow light (12–16 hours/day) or a south-facing window (6+ hours of direct light).
- ● Plastic wrap or humidity dome: To retain moisture while seeds germinate.
- ● Misting bottle or spray nozzle: For gentle watering (avoid soaking the soil!).
- ○ Fertilizer (optional but helpful): A balanced liquid fertilizer (5-10-5 or 10-10-10) diluted to half-strength for seedlings.
- ○ Heat mat (optional): Asparagus seeds germinate faster in 70–80°F soil—a seedling heat mat speeds this up!
- ● Small fan: For airflow to prevent damping-off disease (place near seedlings after germination).
- ● pH test kit: Asparagus thrives in 6.5–7.5 pH soil; adjust with lime or sulfur if needed.
- ● Twine or labels: To mark pots and track planting dates (asparagus takes 2–3 years to harvest!).
- ● Scissors or knife: For trimming seedlings if they outgrow their pots.
Step-by-step guide to growing asparagus from seed indoors
Here's how to kickstart your asparagus crowns indoors—patience pays off with harvests for years.
🌱 Step 1: Prepare Seeds and Containers for Germination
Asparagus seeds need a cold stratification period to break dormancy. Place seeds in a damp paper towel, fold it, and refrigerate for 8-12 weeks in a sealed plastic bag. Check weekly—they're ready when they sprout or after the full time. This mimics winter conditions and ensures strong germination.
Use 4-inch deep pots with drainage holes and fill them with sterile seed-starting mix. I like to add a handful of perlite to improve drainage—asperagus roots hate soggy soil. Moisten the mix until it's damp but not dripping, then press it down lightly to create a firm seedbed.
💧 Step 2: Sow Seeds and Maintain Moisture
Scatter seeds ¼ inch deep across the soil surface, spacing them 1 inch apart. Cover lightly with additional mix—just enough to obscure them. Mist the surface with water until evenly damp, then place the pots in a 70-75°F environment. A seedling heat mat helps maintain consistent warmth.
Keep the soil consistently moist but never soggy. I use a spray bottle to avoid disturbing seeds. Place a clear plastic dome or wrap a plastic bag loosely over the pots to retain humidity. Germination takes 3-6 weeks, so be patient—asperagus isn't the fastest starter. Once sprouts appear, remove the cover immediately to prevent fungal issues.
☀️ Step 3: Provide Light and Care for Seedlings
Asparagus seedlings need bright light from day one. Place them under grow lights positioned 3-4 inches above the plants for 14-16 hours daily. Without enough light, seedlings grow leggy and weak. You'll notice strong seedlings have deep green leaves and thick stems—these are your goal.
Water when the top inch of soil feels dry, but avoid overwatering. Asparagus is drought-tolerant once established, but seedlings need consistent moisture. Fertilize lightly with a balanced liquid fertilizer (10-10-10) at half strength every 2-3 weeks once the first true leaves appear. This encourages steady growth without burning tender roots.
🪴 Step 4: Harden Off and Transplant
After 8-10 weeks, when seedlings have 4-6 leaves, it's time to harden them off. Start by placing them outside in a shaded, sheltered spot for 1-2 hours the first day. Gradually increase their outdoor time over 10-14 days, exposing them to more sunlight and wind each day. This prepares them for the garden.
Choose a sunny location with well-draining soil for transplanting. Asparagus needs full sun and deep, fertile soil to thrive. Space seedlings 12-18 inches apart in rows 3-4 feet apart. Water deeply after transplanting to help roots establish. Mulch around the base with 2-3 inches of organic mulch to retain moisture and suppress weeds.
⏰ Step 5: First Year and Beyond
The first year is all about root development. Don't harvest any spears—let the plants focus on growing a strong crown. You'll see fern-like foliage emerge in late spring, which is normal. Cut it back to 2 inches tall in early fall to encourage root growth for next year's harvest.
Asparagus is a perennial, meaning it comes back year after year. By the third year, you'll start harvesting spears in early spring when they're 6-8 inches tall. Cut them at ground level and enjoy fresh asparagus straight from your garden. With proper care, a single plant can produce spears for 15-20 years—making it a worthwhile long-term investment.
Tips & tricks for growing asparagus from seed indoors
Took me a few failed attempts to master these tricks—here's how to avoid the common pitfalls with indoor asparagus cultivation.
Cold Stratification Secret: Don't skip the 8-12 week cold stratification step! Place a small piece of tape on your refrigerator door with the start date to track progress. This mimics winter conditions that break seed dormancy—skipping it results in poor germination rates. I've seen seeds that sprouted after just 6 weeks, but never trust them completely until the full 12 weeks are up.
Lighting Strategy: Those 14-16 hours of daily light under grow lights are non-negotiable for strong seedlings. Position your lights just 3-4 inches above the plants and adjust as they grow—too high and they'll stretch, too low and you risk burning. I use a simple timer to automate the light cycle, which saves me from remembering to turn them on/off daily.
Harden Off Gradually: The 10-14 day hardening process is where most beginners rush. Start with just 1-2 hours in shade on day one, then increase by 1-2 hours each subsequent day. Watch for wilting—if you see it, they're not ready for more sun yet. This gradual transition prevents transplant shock that can kill delicate seedlings.
First Year Wisdom: Remember, the first year is all about roots! When you see those fern-like foliage emerge in spring, resist the temptation to harvest—even a single spear weakens the developing crown. Cutting back to 2 inches in early fall is crucial for building a strong root system that will produce spears for years to come.
Pro Tips for Growing Asparagus From Seed Indoors
- Took me a few failed attempts to master these tricks—here's how to avoid the common pitfalls with indoor asparagus cu...
- Cold Stratification Secret: Don't skip the 8-12 week cold stratification step! Place a small piece of tape on your re...
- Lighting Strategy: Those 14-16 hours of daily light under grow lights are non-negotiable for strong seedlings. Positi...
Frequently asked questions
about growing asparagus from seed indoors—because every gardener’s journey starts with the right answers!How long does it take for asparagus seeds to germinate indoors?
Asparagus seeds are slow starters—expect germination in 4 to 6 weeks if conditions are ideal (warmth, moisture, and patience!). Pre-soaking seeds for 24 hours can speed this up slightly, but don’t rush it. Consistency is key—keep soil moist but not soggy, and avoid moving the tray once planted.
Can I harvest asparagus from indoor seedlings in the first year?
Nope! Indoor-grown asparagus is a 3-year commitment before harvest. The first year focuses on root and crown development, year two yields tiny spears (if you’re lucky), and year three delivers the full harvest. Think of it as an investment—your future salads will thank you!
Why aren’t my asparagus seeds sprouting? Troubleshooting tips?
Here’s your indoor asparagus seed checklist:
- Temperature: Keep soil at 70–75°F (use a heat mat if needed).
- Moisture: Seeds need constant dampness (not waterlogged). Mist daily or use a humidity dome.
- Light: Bright, indirect light is critical—seeds won’t sprout in darkness.
- Patience: If nothing happens in 6 weeks, try fresh seeds or a scarification trick (lightly nick the seed coat with sandpaper).
Is it better to start asparagus indoors or buy crowns?
Indoor seeds are cheaper and fun for beginners, but crowns (pre-grown roots) mature 1–2 years faster. If you’re short on time or space, crowns win. For a DIY challenge, seeds are rewarding—just brace for the wait!
Can I transplant indoor asparagus seedlings outside later?
Once seedlings have 3–4 true leaves and are 3–4 inches tall, they’re ready for outdoor transplanting (after last frost). Choose a sunny, well-draining spot with rich soil—amend with compost for best results. Harden them off for 1–2 weeks first to avoid shock.
What’s the trick to growing asparagus indoors year-round?
Asparagus is a perennial, so indoor success hinges on:
- Light: Supplement with grow lights (12–14 hrs/day) for winter growth.
- Space: Use deep containers (12+ inches)—roots need room to stretch!
- Dormancy: Mimic winter by reducing water in late fall to encourage rest.
- Pests: Watch for aphids or fungus—spray with neem oil if needed.
Wrapping up and next steps
Growing asparagus from seed indoors is a rewarding journey that blends patience with the joy of nurturing life from scratch. 🌱 While it takes time—often 2-3 years before your first harvest—your dedication will pay off with lush, homegrown spears year-round.
Once your plants are thriving, consider transplanting them outdoors to a permanent garden bed for long-term success.
Now that you’re armed with tips and techniques, roll up your sleeves and get planting! Every gardener starts somewhere, and your asparagus adventure is just beginning. Happy growing! 🌱✨